Tutorial - Image Processing Tools Guide
Learn how to use all image processing tools with detailed step-by-step guides, screenshots and video tutorials
Table of Contents
Image Compression Tutorial
Overview
The image compression tool helps you reduce image file size while maintaining quality. It supports batch processing, quality adjustment and multiple output formats.
Screenshots
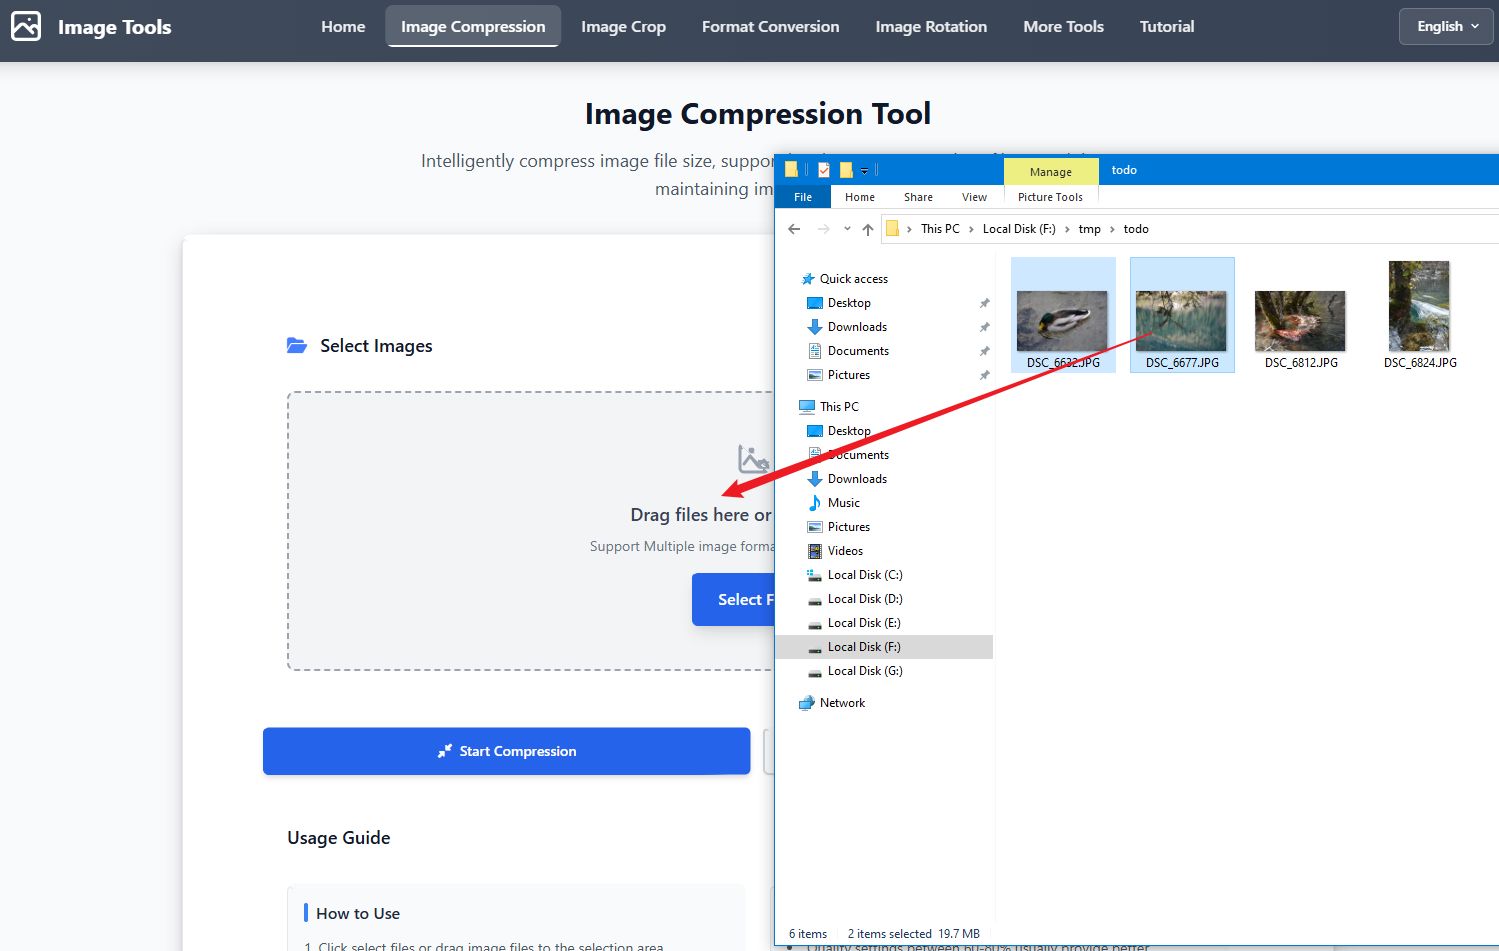
Step 1: Select Images
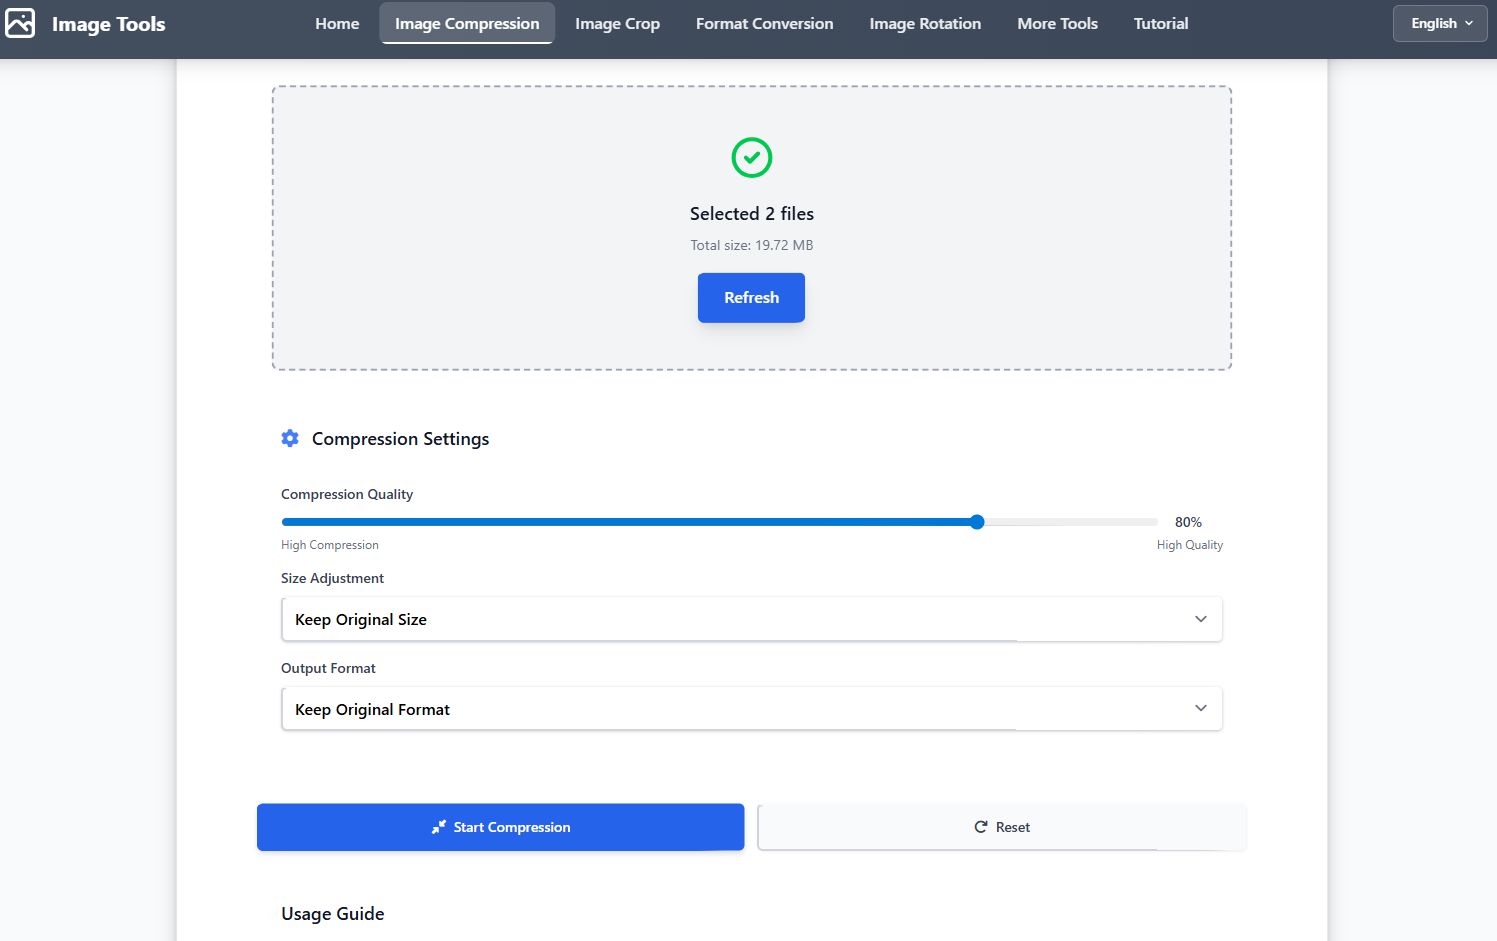
Step 2: Adjust Settings
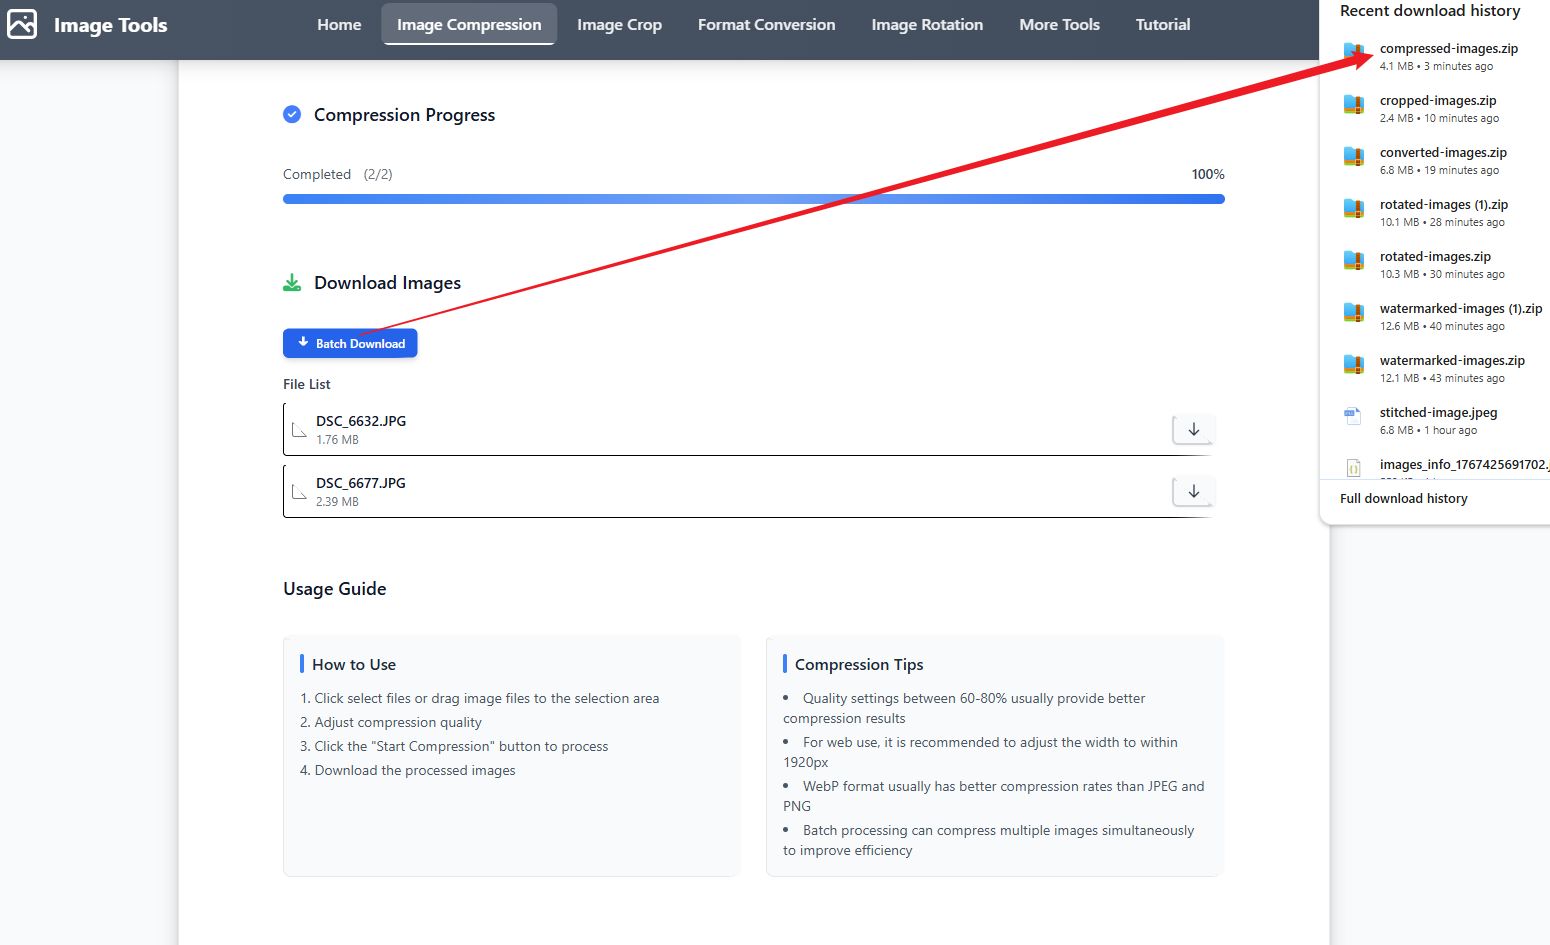
Step 3: Download Results
Video Tutorial
Step-by-Step Guide
- Click Select Images or drag and drop image files to the upload area
- Adjust the compression quality slider (1-100%) to balance file size and image quality
- Select size adjustment options: keep original size, adjust by width/height/long edge or by percentage
- Select output format: keep original format, JPEG, PNG or WebP
- Click Start Compression to process all selected images
- Preview results and download individually or as a ZIP file
Tips
- Quality settings between 60-80% usually provide the best compression results
- For web use, it is recommended to adjust the width to within 1920px
- WebP format usually has better compression than JPEG and PNG
- Batch processing can compress multiple images at once, improving efficiency
- Compare original and compressed file sizes to find the best quality setting
FAQ
Image Crop Tutorial
Overview
The image crop tool allows you to precisely crop images, supporting free crop and preset aspect ratios. It supports rotation, flip and batch processing.
Screenshots
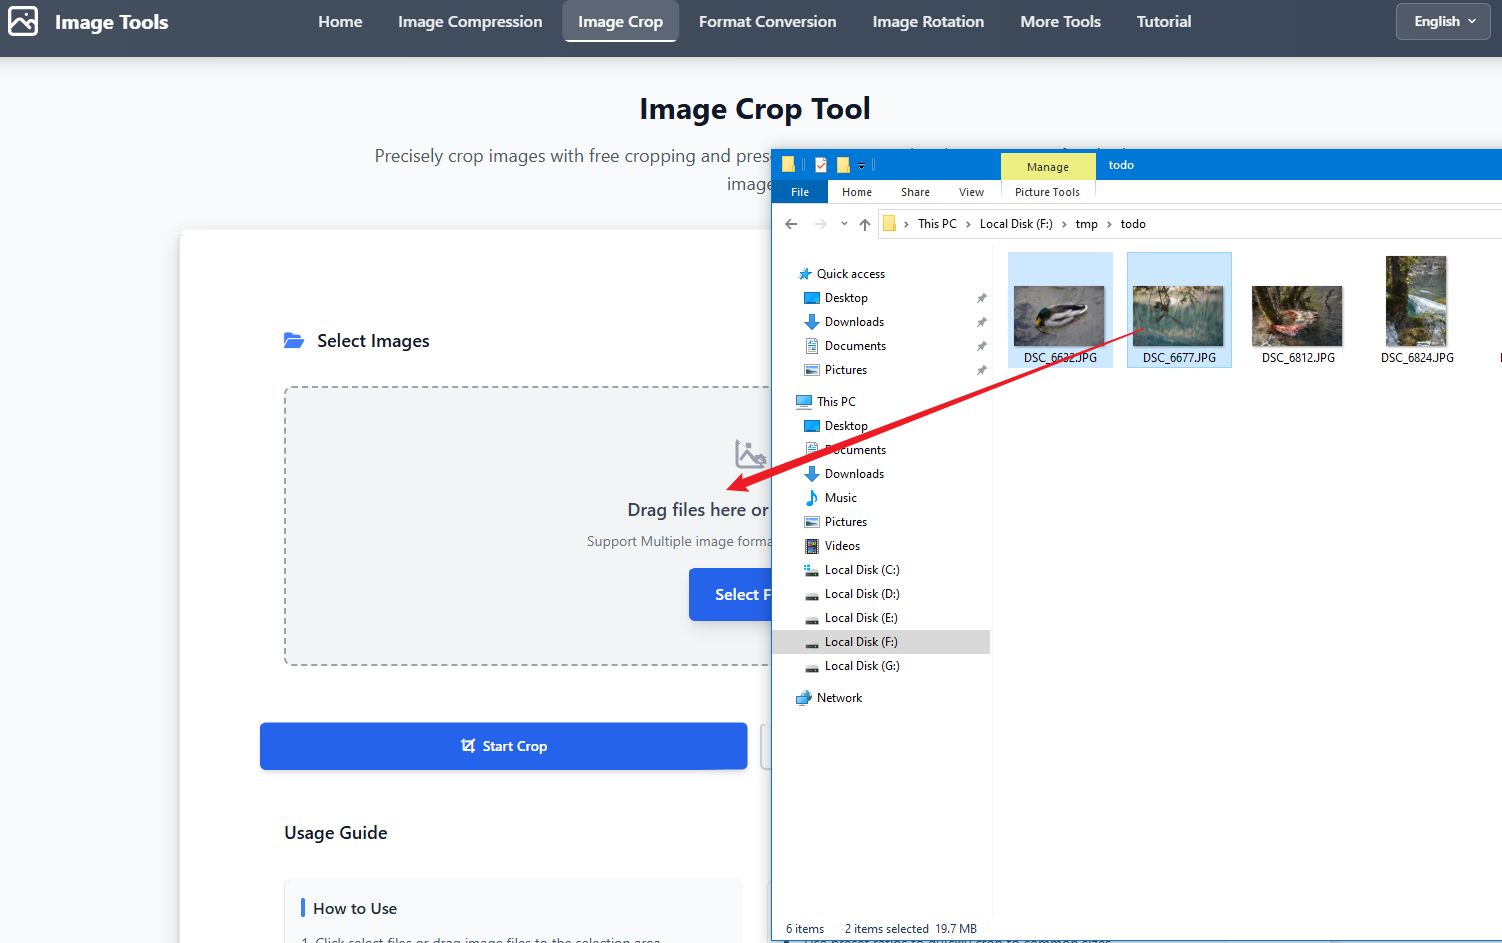
Step 1: Select Images
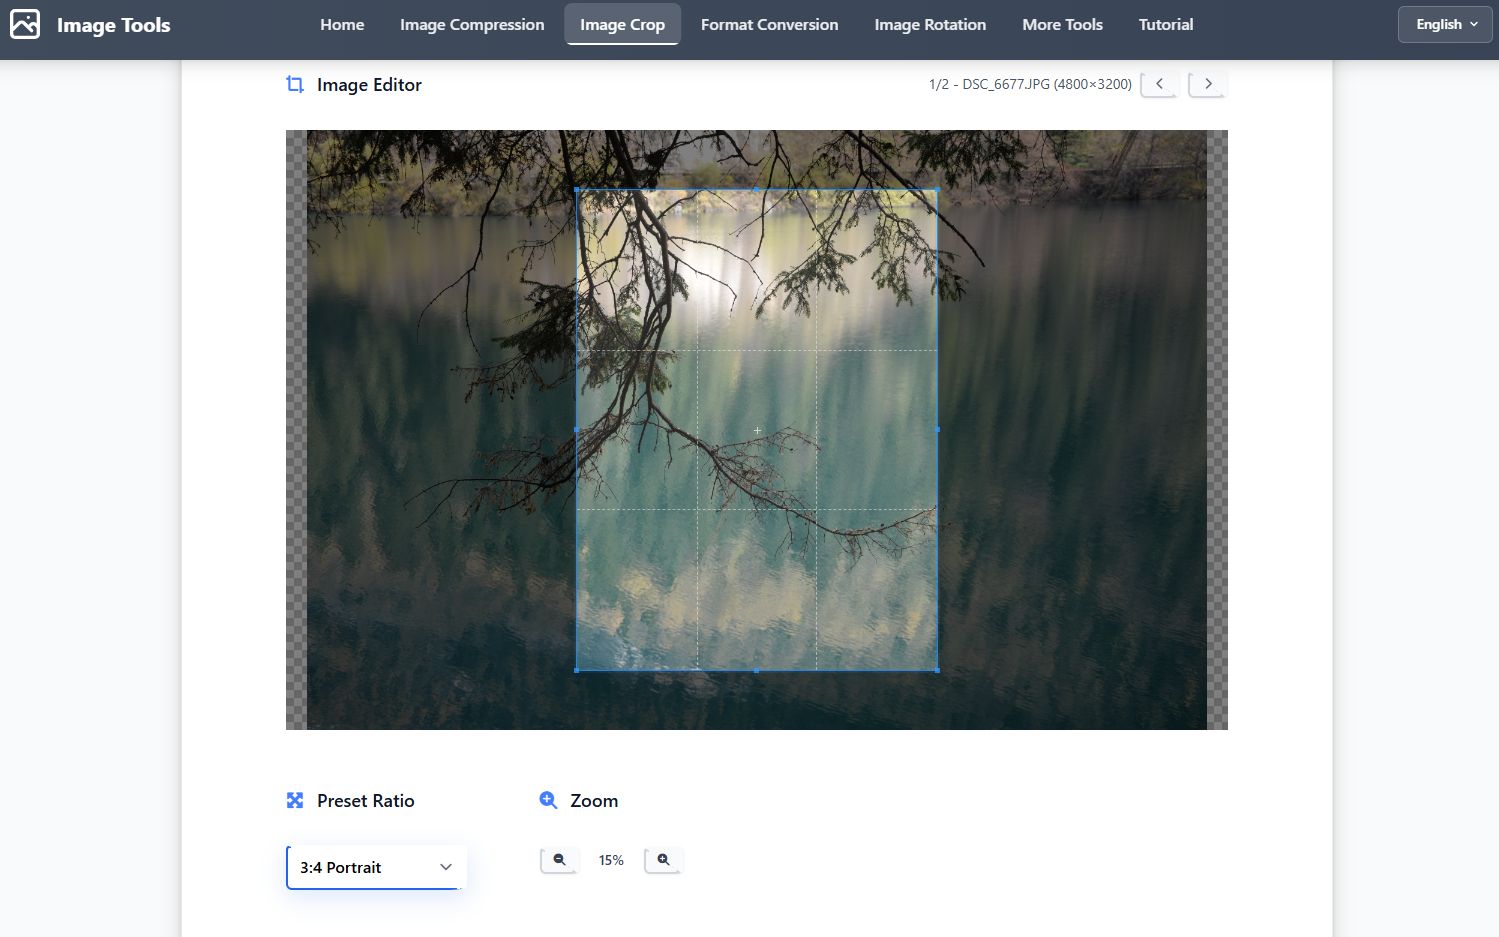
Step 2: Select Crop Area
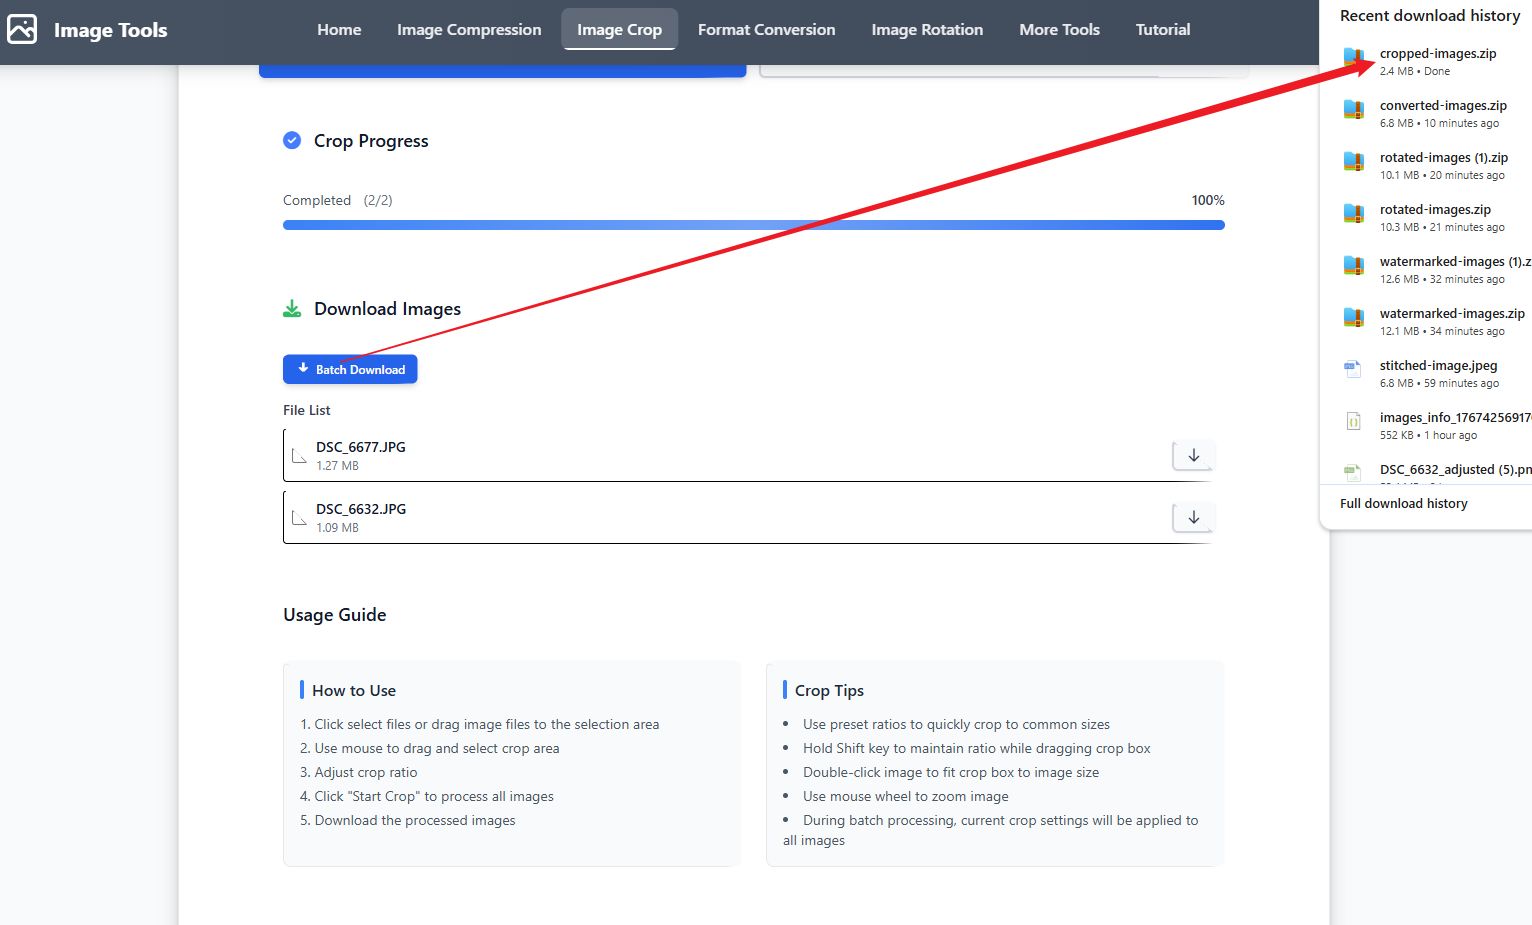
Step 3: Download Results
Video Tutorial
Step-by-Step Guide
- Click Select Images or drag and drop image files to the upload area
- Use mouse drag to select the crop area
- Select preset aspect ratios (1:1, 4:3, 16:9, etc.) or use free crop
- Adjust the crop area by dragging corners or edges
- Click Start Crop to apply cropping to all selected images
- Download cropped images, individually or as a ZIP file
Tips
- Hold Shift key while dragging to maintain current aspect ratio
- Use mouse wheel to zoom the image
- Preset aspect ratios are perfect for social media posts (1:1 for Instagram, 16:9 for YouTube)
- Batch processing applies the same crop settings to all images
FAQ
Format Conversion Tutorial
Overview
The format conversion tool allows you to convert images between different formats, including JPEG, PNG, WebP, GIF, BMP and ICO. It supports batch processing and quality adjustment.
Screenshots
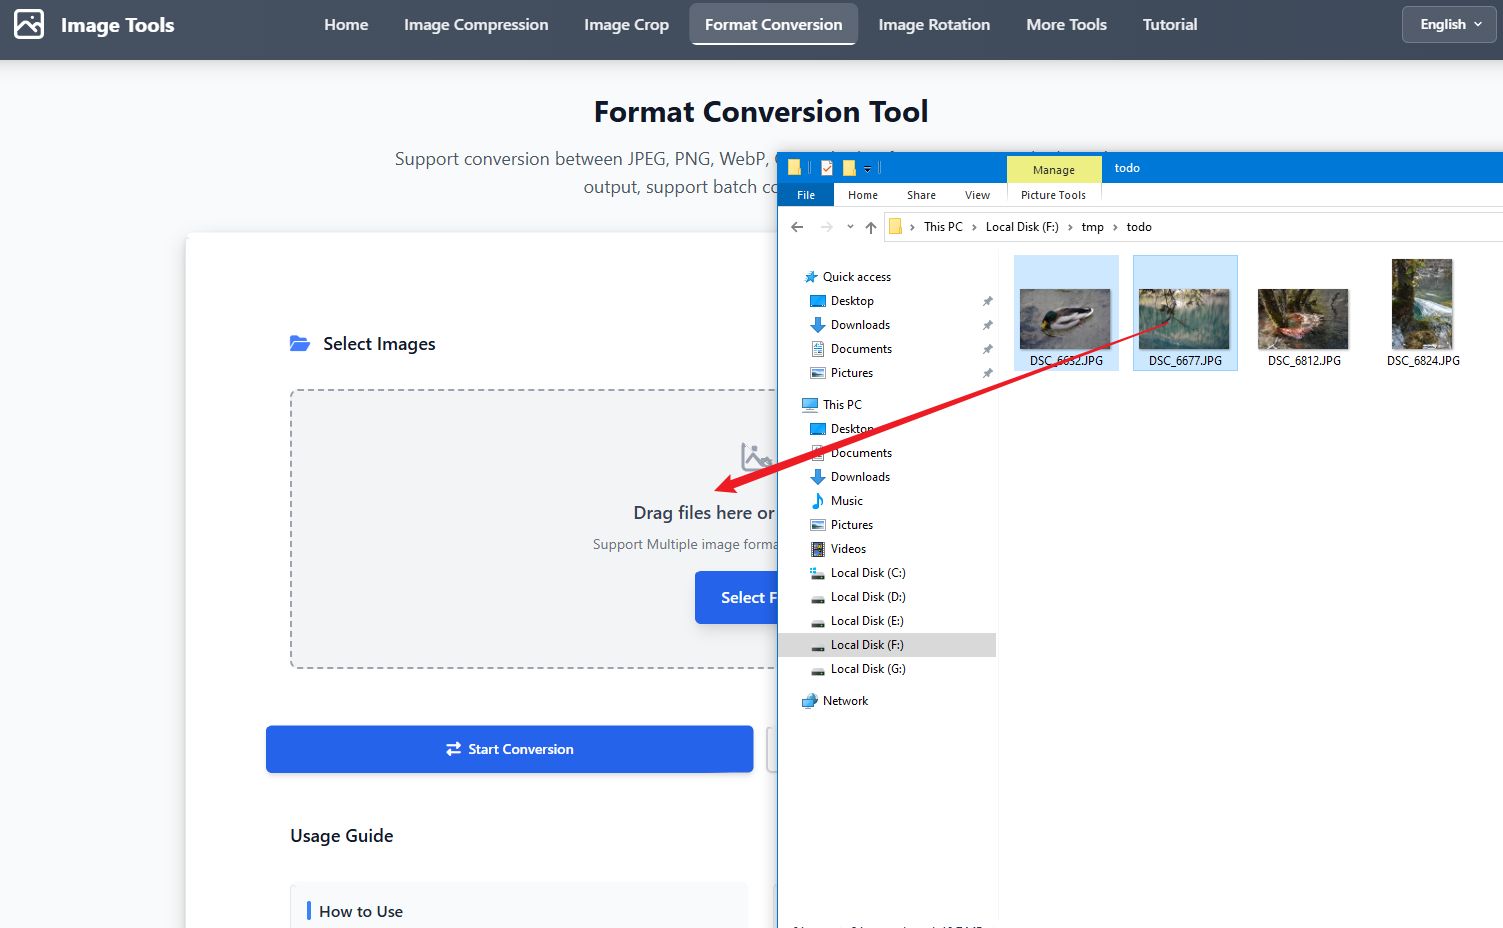
Step 1: Select Images
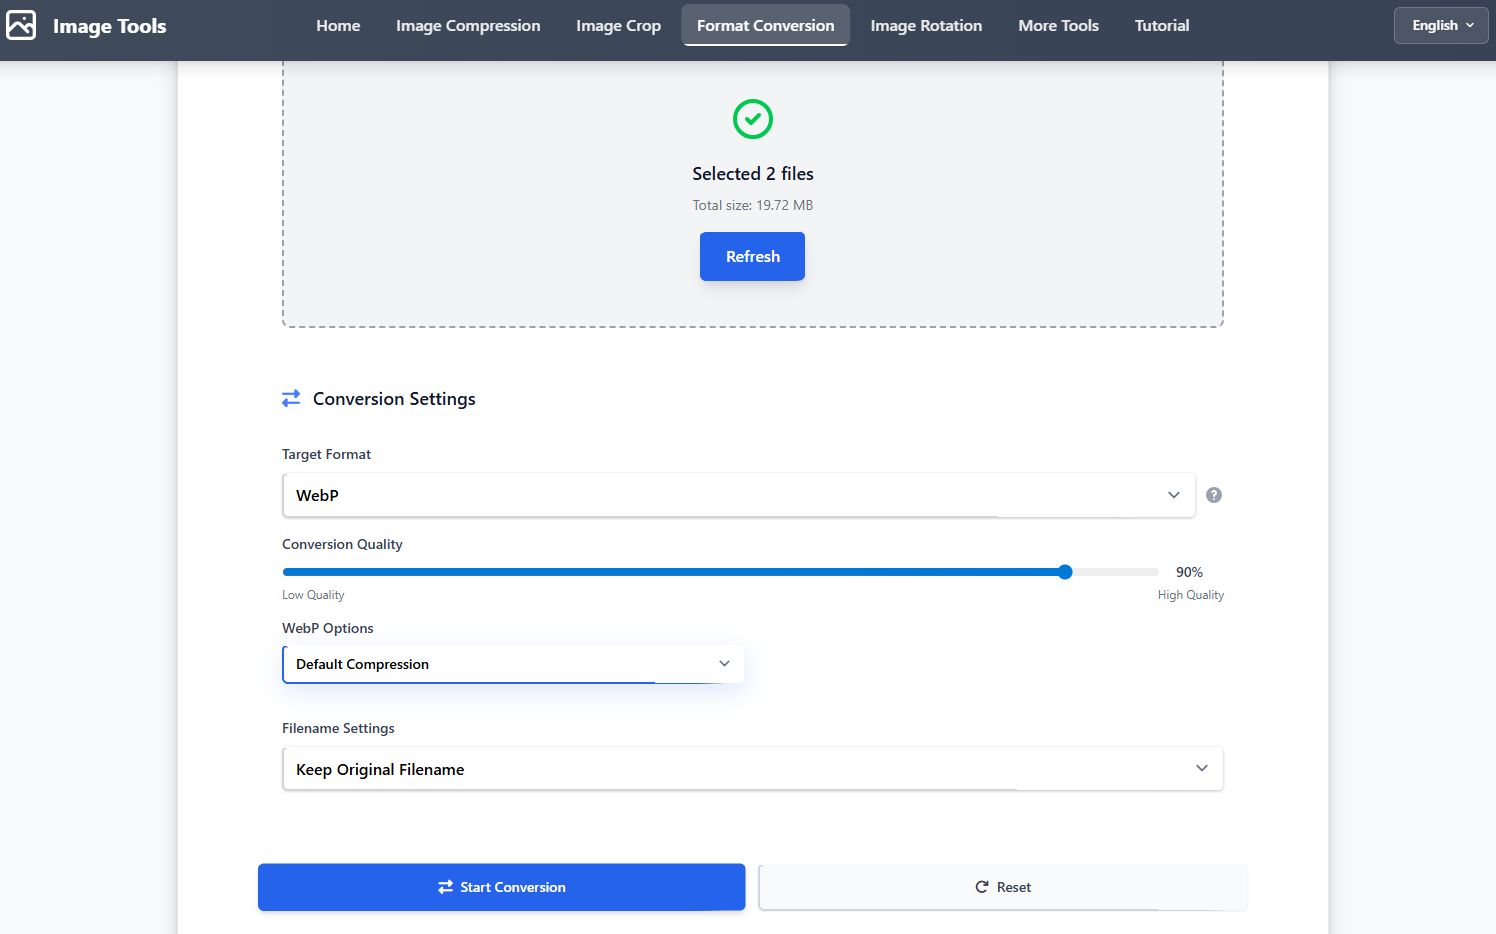
Step 2: Select Format
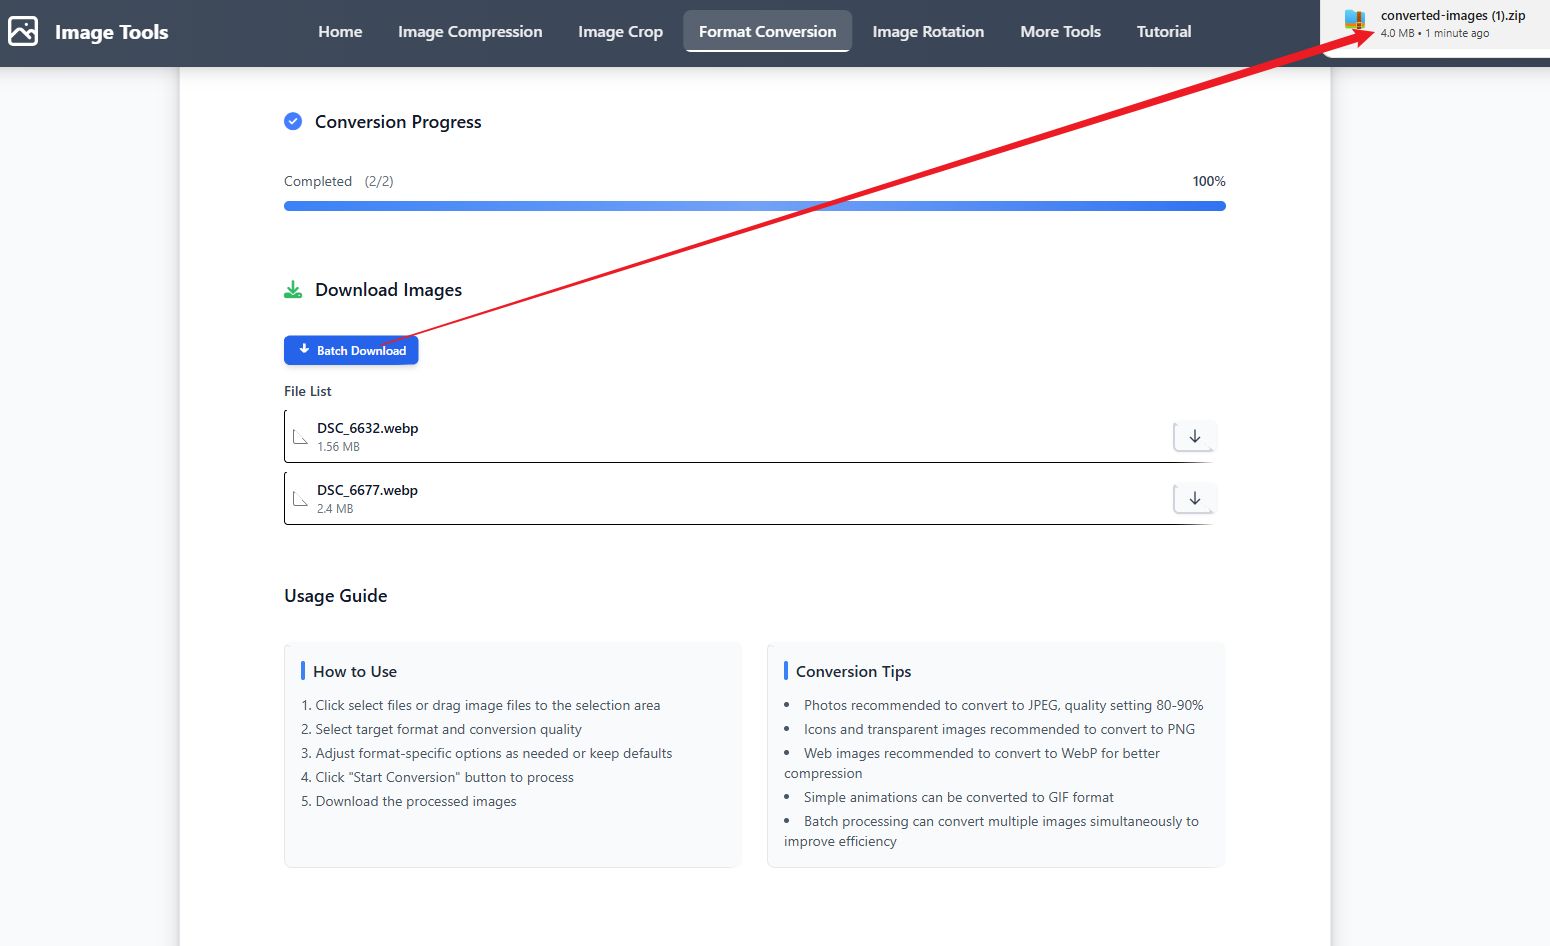
Step 3: Download Results
Video Tutorial
Step-by-Step Guide
- Click Select Images or drag and drop image files to the upload area
- Select target format from the dropdown menu (JPEG, PNG, WebP, GIF, BMP, ICO)
- Adjust conversion quality slider (for formats that support quality)
- Configure format-specific options as needed or keep defaults
- Set filename options (keep original filename, add suffix or completely replace)
- Click Start Conversion to process all selected images
- Download converted images, individually or as a ZIP file
Tips
- Photos are recommended to convert to JPEG with quality setting 80-90%
- Icons and transparent images are recommended to convert to PNG
- Web images are recommended to convert to WebP for better compression
- Simple animations can be converted to GIF format
- Batch conversion can process multiple files at once
FAQ
Image Rotation Tutorial
Overview
The image rotation tool allows you to precisely rotate and flip images. It supports quick 90-degree rotation, arbitrary angle rotation and batch processing.
Screenshots
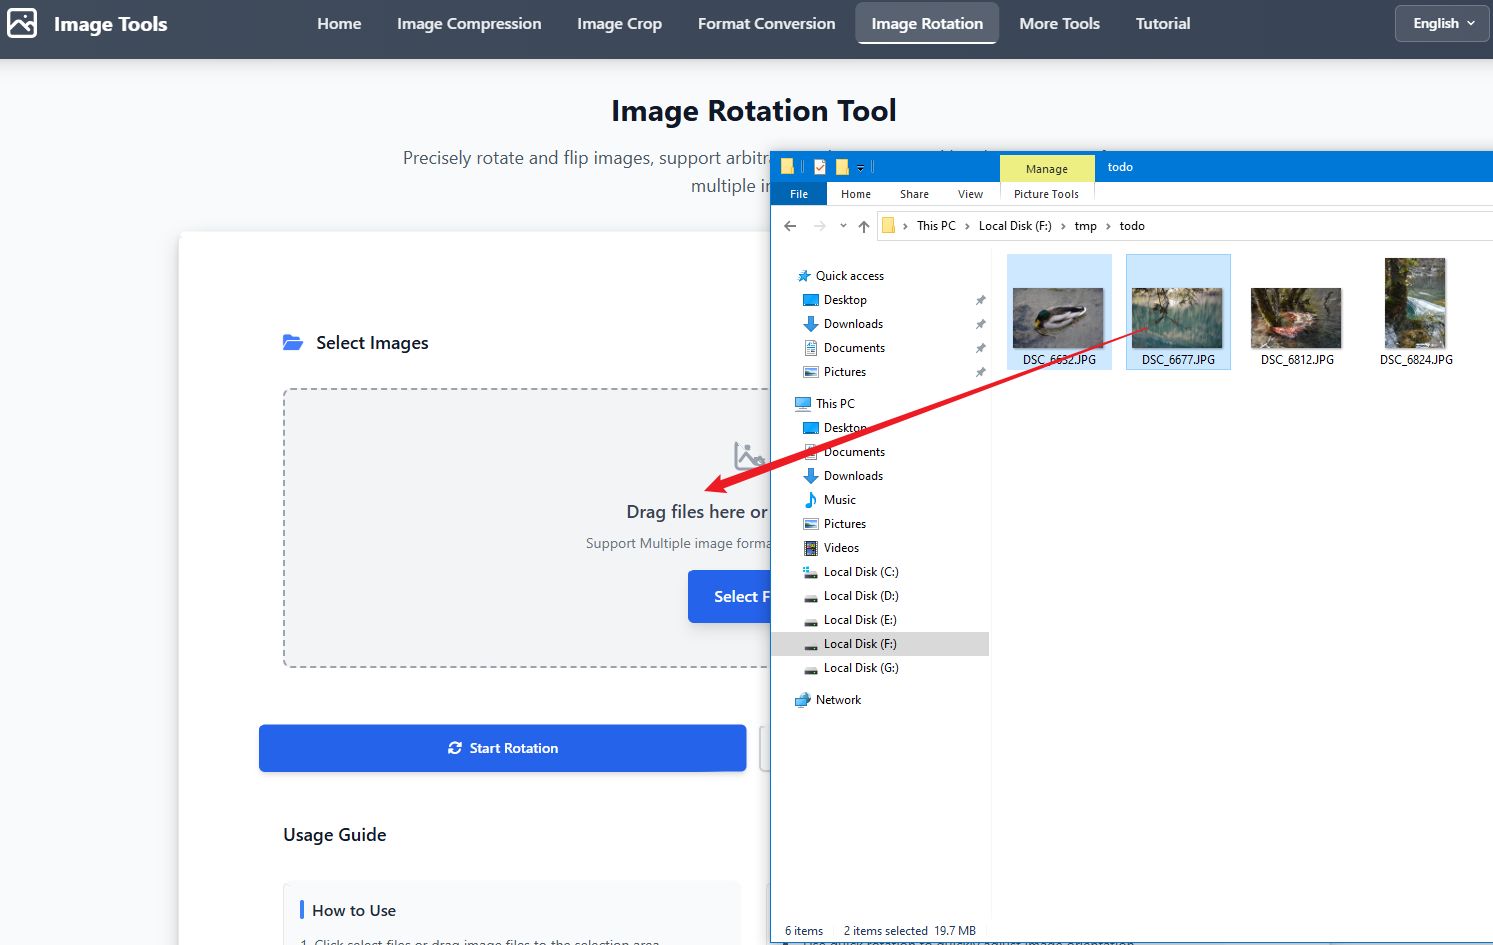
Step 1: Select Images
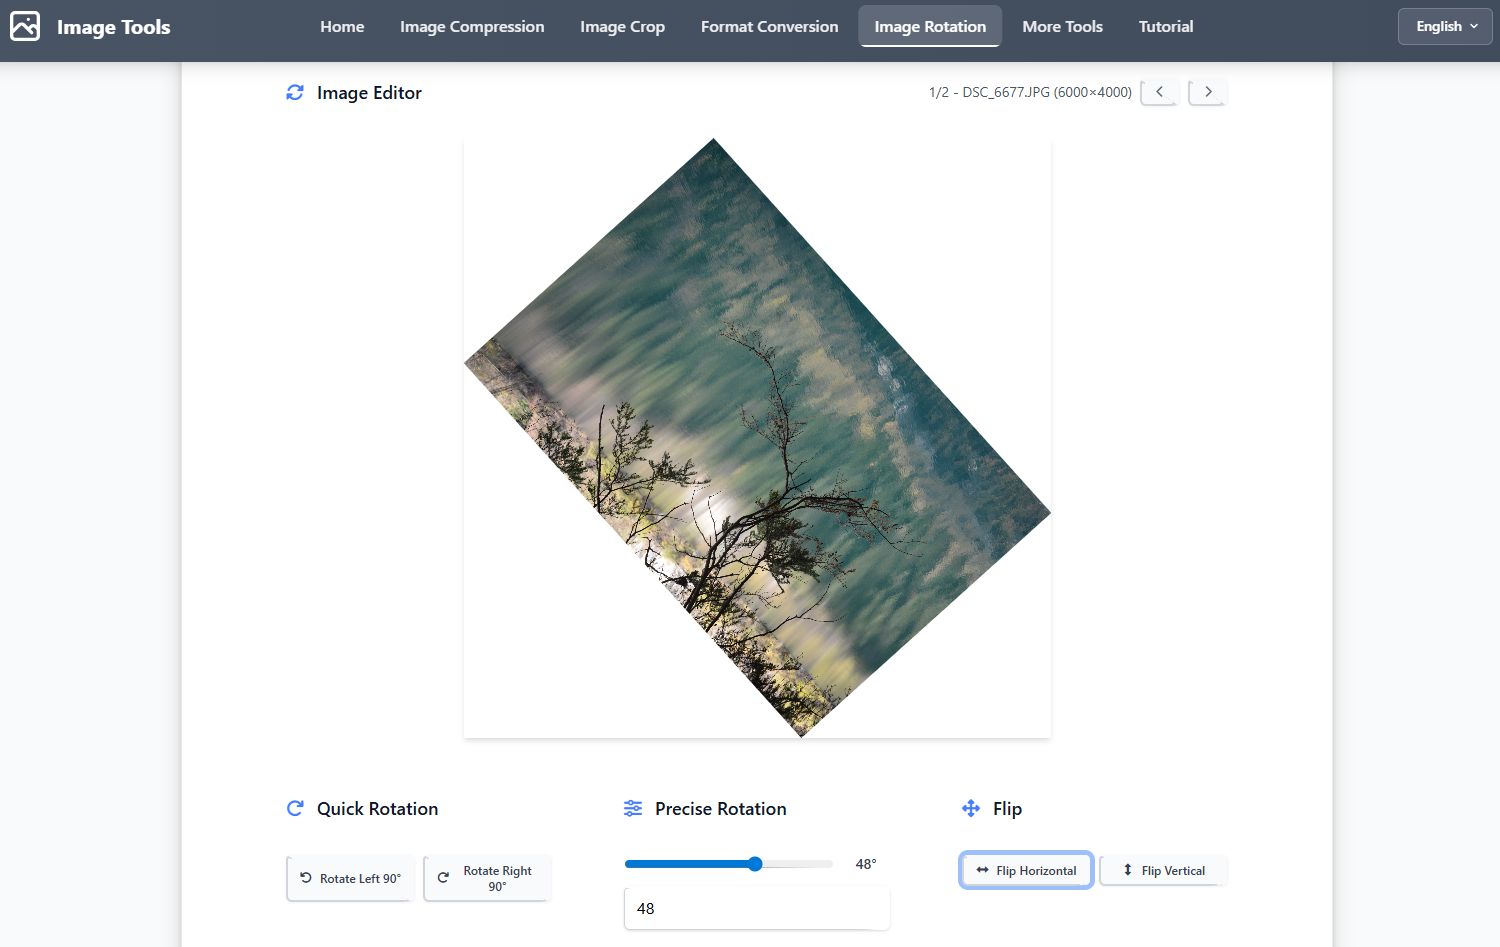
Step 2: Adjust Rotation
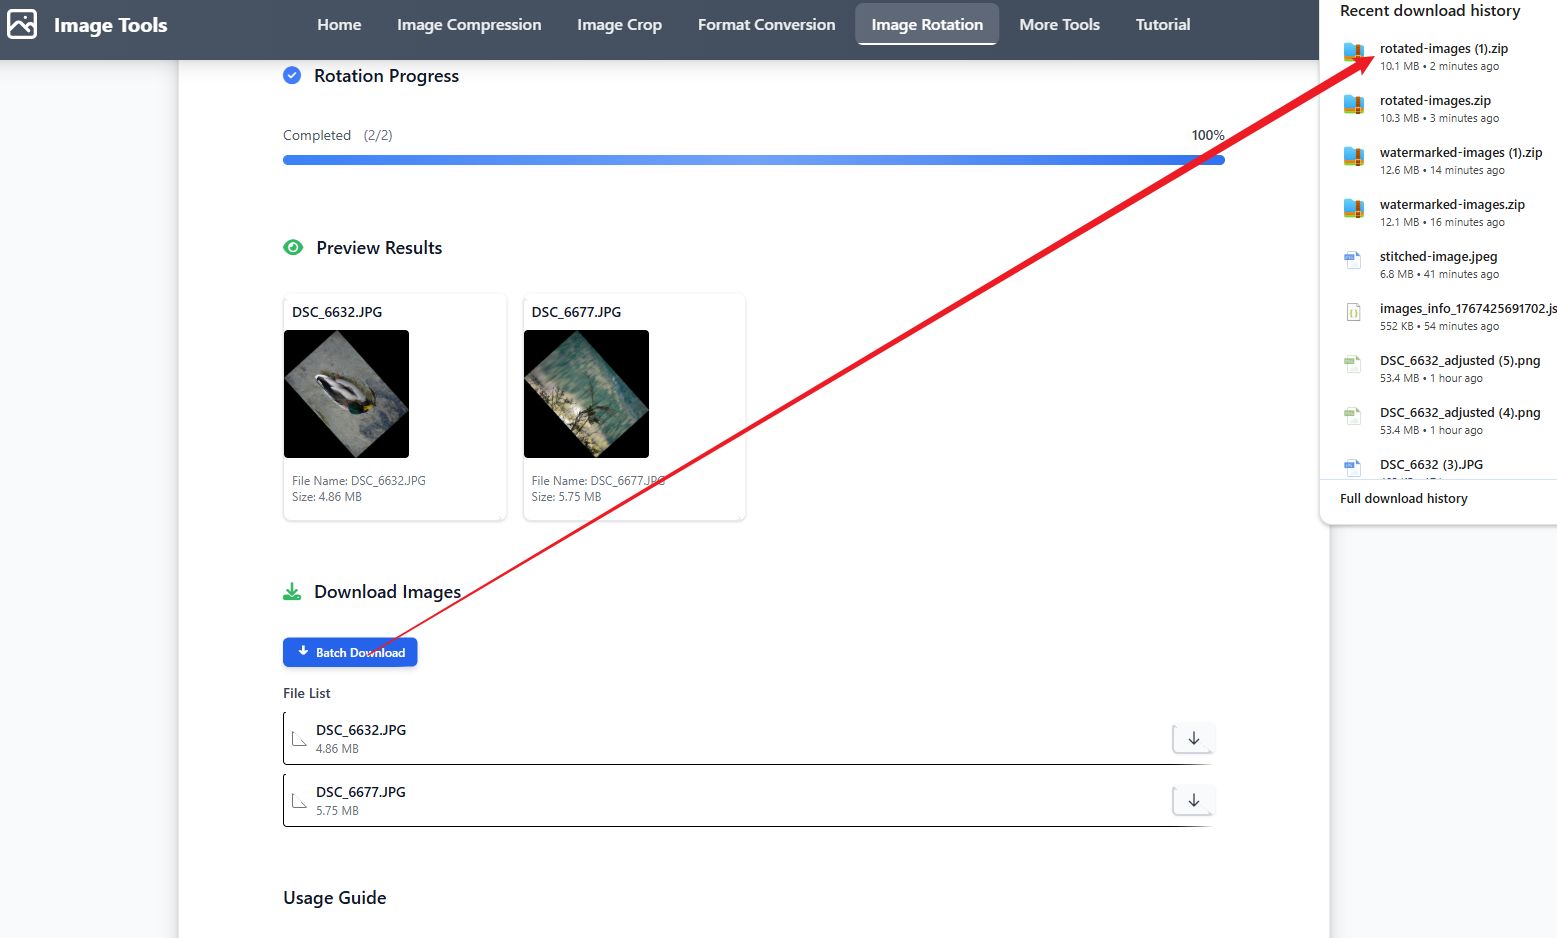
Step 3: Download Results
Video Tutorial
Step-by-Step Guide
- Click Select Images or drag and drop image files to the upload area
- Use quick rotation buttons for 90-degree left or right rotation
- Use slider or input box for precise angle rotation (-180° to 180°)
- Use flip buttons for horizontal or vertical mirroring
- Preview rotation effects in real-time
- Click Start Rotation to apply rotation to all selected images
- Download rotated images, individually or as a ZIP file
Tips
- Quick rotation is perfect for fixing photo orientation issues from camera
- Precise rotation supports arbitrary angles for creative effects
- You can combine rotation and flip functions
- Batch processing applies the same settings to all images
- Rotated images maintain their original resolution
FAQ
Image Watermark Tutorial
Overview
The image watermark tool allows you to add text or image watermarks to images, protecting your copyright, supporting batch processing of multiple images.
Screenshots
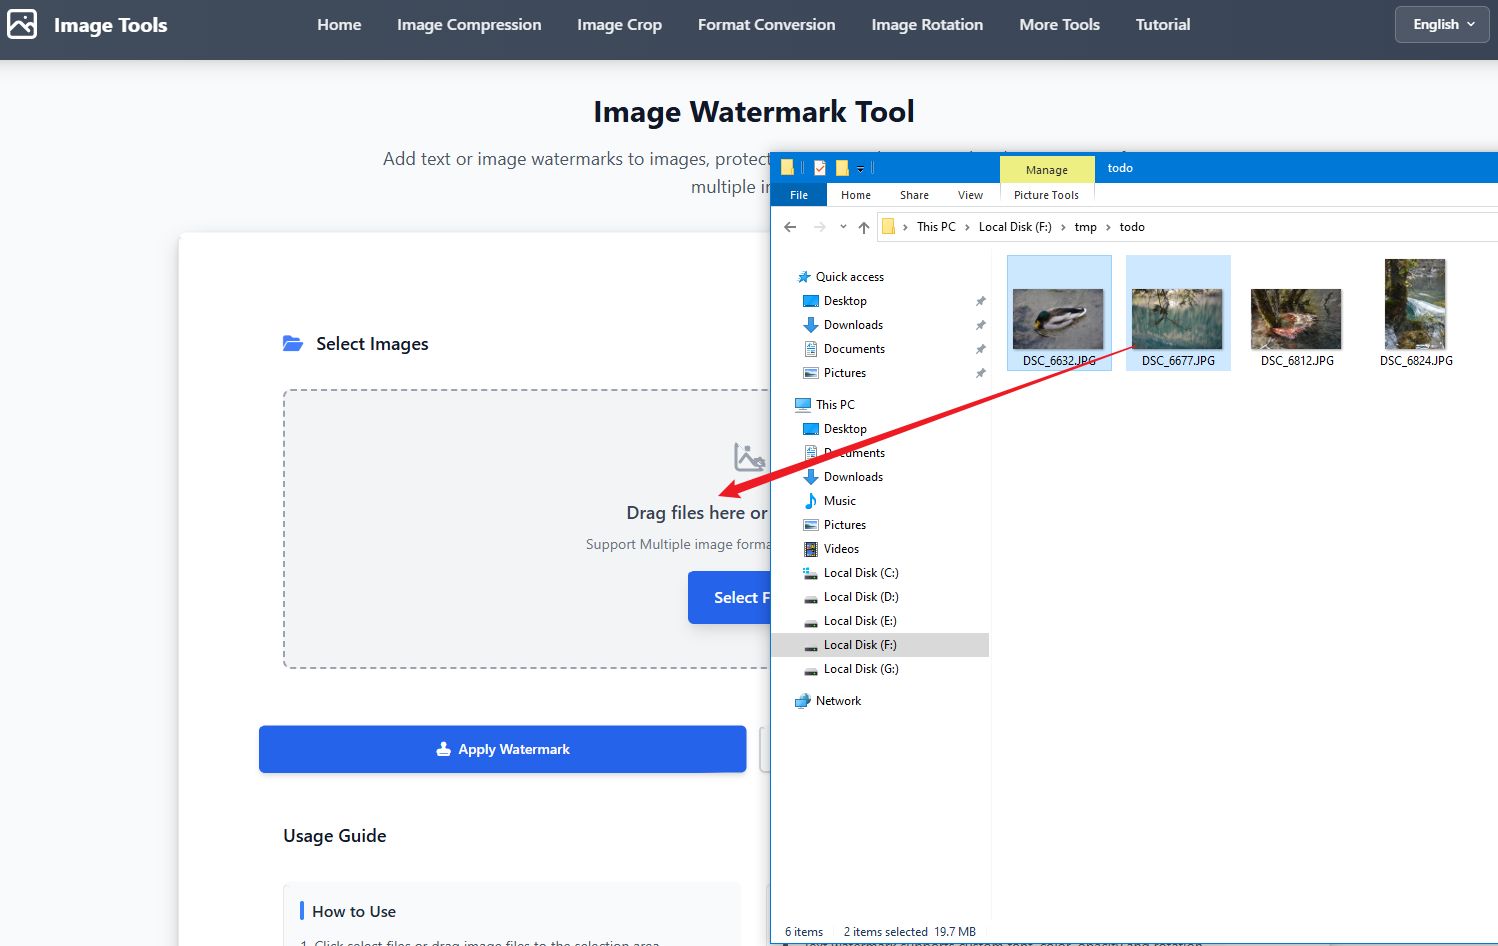
Step 1: Select Images
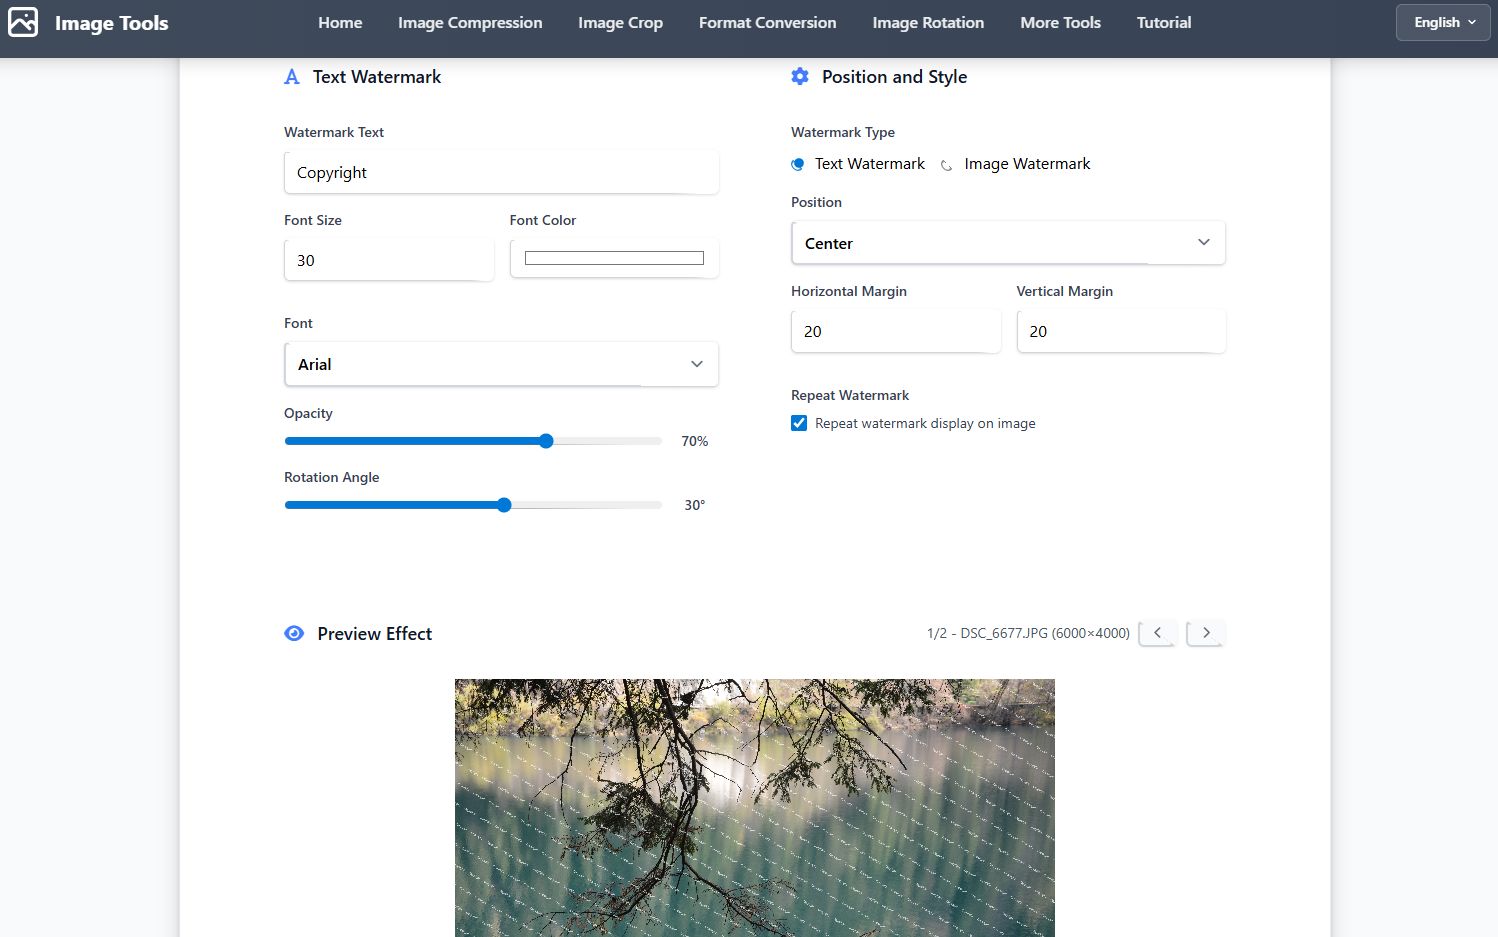
Step 2: Set Watermark
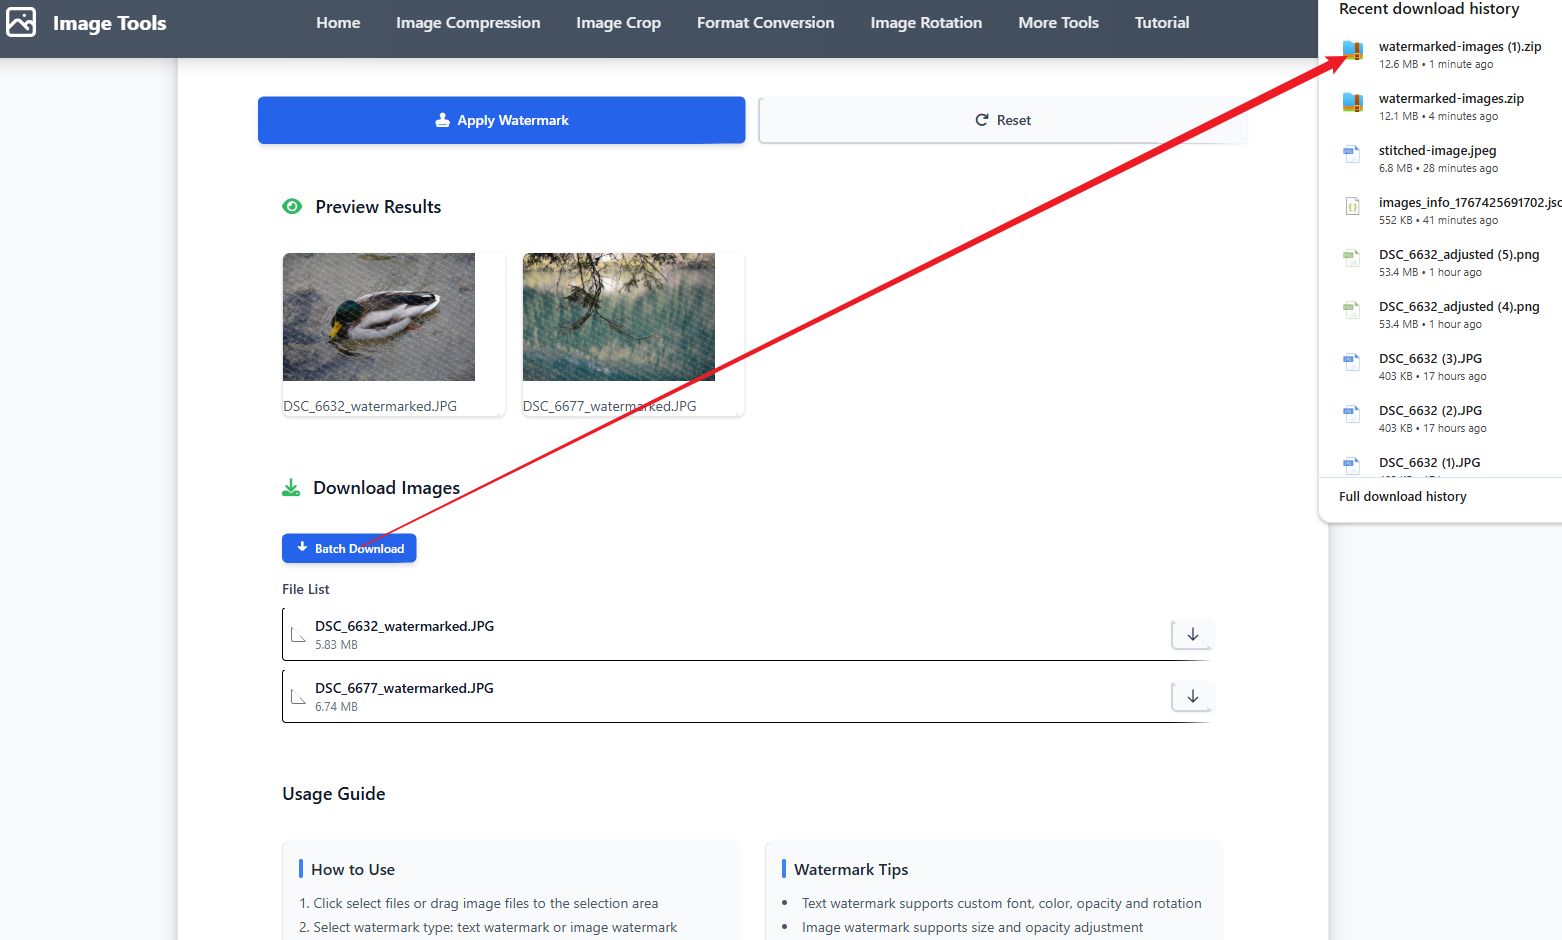
Step 3: Download Results
Video Tutorial
Step-by-Step Guide
- Click Select Images or drag and drop image files to the upload area
- Select watermark type: text watermark or image watermark
- For text watermark: enter text, adjust font size, color, opacity, and rotation angle
- For image watermark: select watermark image, adjust size and opacity
- Select watermark position (9 positions available) and adjust margins
- Enable watermark repeat to tile watermark across the entire image
- Preview the effect, then click Apply Watermark to process all images
- Download processed images, individually or as a ZIP file
Tips
- Text watermark supports custom font, color, opacity and rotation angle
- Image watermark supports adjusting size and opacity
- You can set watermark position and margins in the image
- Enable repeat watermark to tile watermark across the entire image
- Batch processing applies the same watermark settings to all images
FAQ
Image Stitch Tutorial
Overview
The image stitch tool allows you to stitch multiple images into one long image or grid, supporting horizontal and vertical stitching, custom spacing and background color.
Screenshots
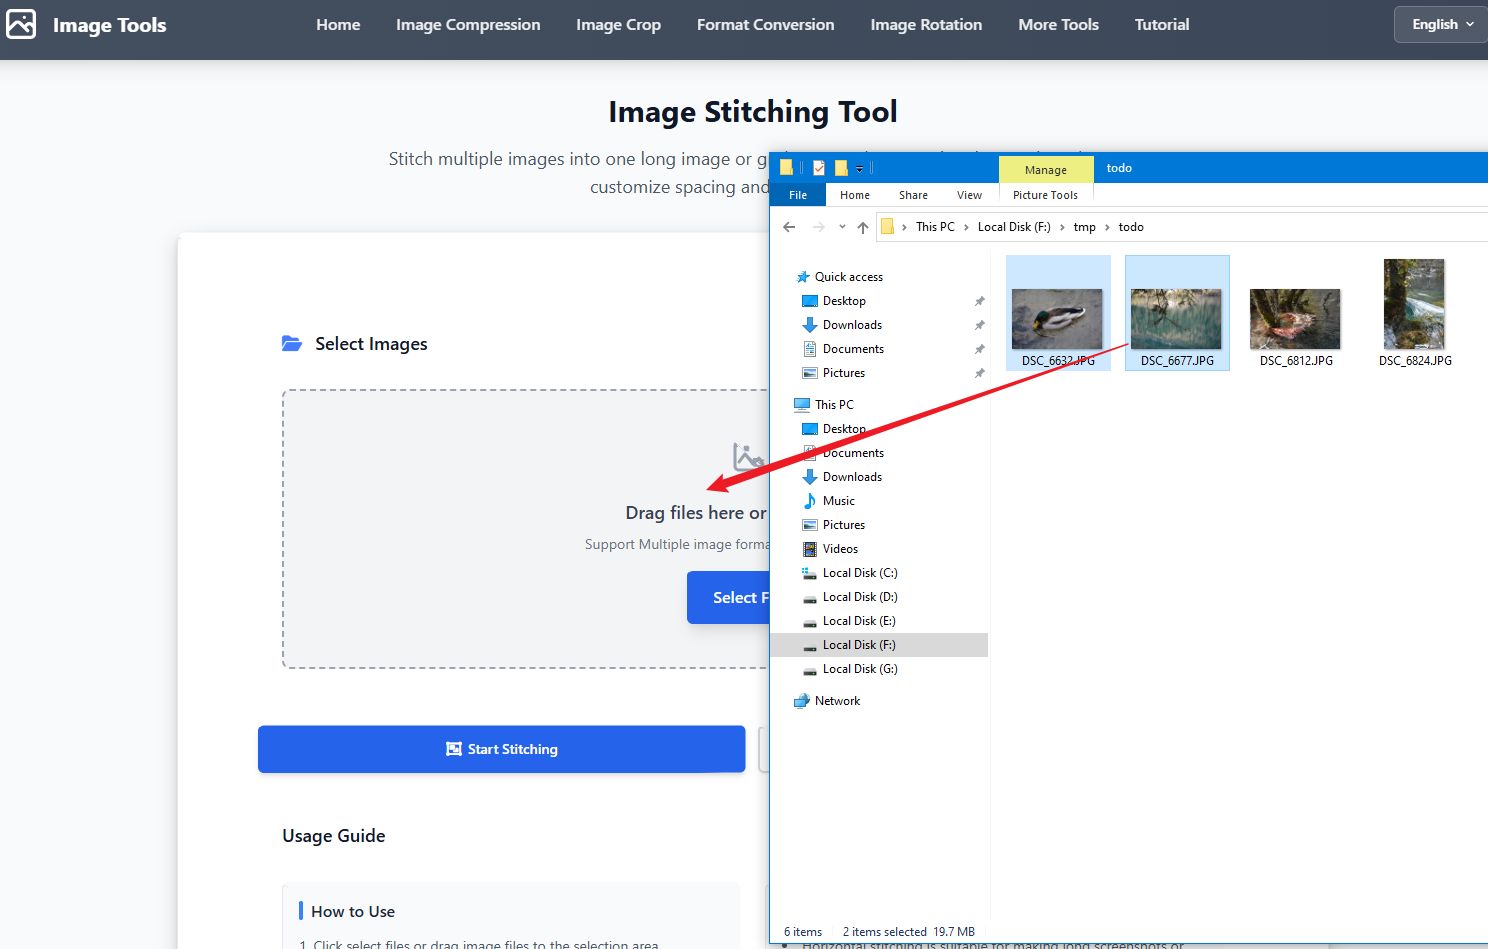
Step 1: Select Images
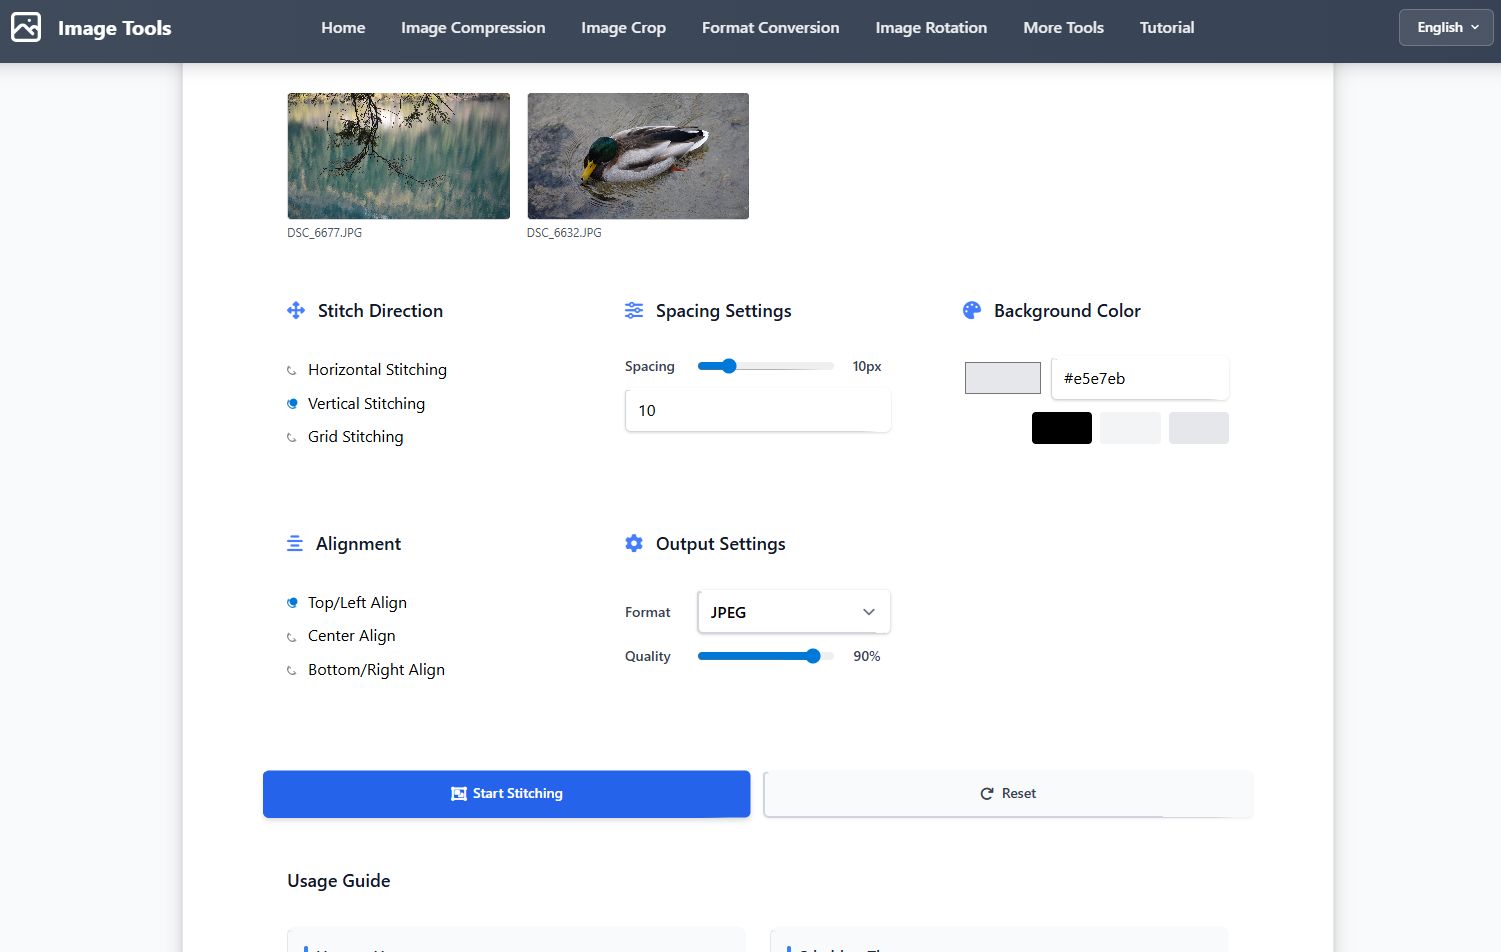
Step 2: Set Stitch Parameters
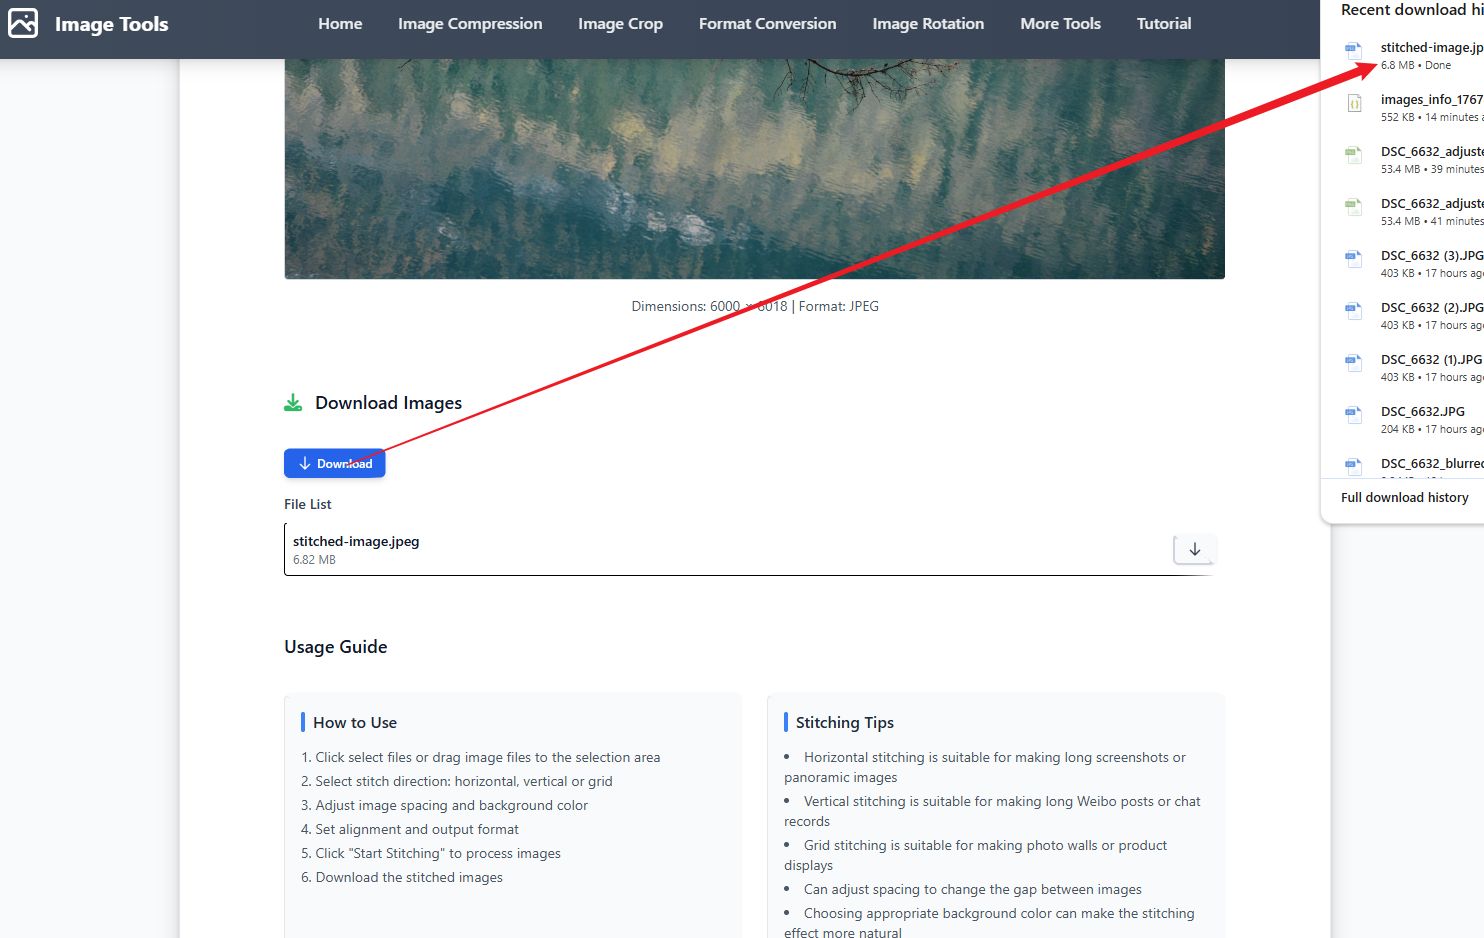
Step 3: Download Results
Video Tutorial
Step-by-Step Guide
- Click Select Images or drag and drop image files to the upload area
- Use the sort buttons to arrange images by name or manually
- Select stitch direction: horizontal, vertical or grid
- Adjust image spacing and background color
- For grid stitching: adjust the number of columns and alignment
- Set the output format and quality
- Click the 'Start Stitching' button to process the images
Tips
- Horizontal stitching is suitable for making long screenshots or panoramic images
- Vertical stitching is suitable for making long Weibo posts or chat records
- Grid stitching is suitable for making photo walls or product displays
- You can adjust the spacing to change the gap between images
- Choosing the right background color can make the stitching effect more natural
FAQ
Image Info Tutorial
Overview
The image info tool allows you to view and analyze detailed image information, including EXIF data, dimensions, format, etc.
Screenshots
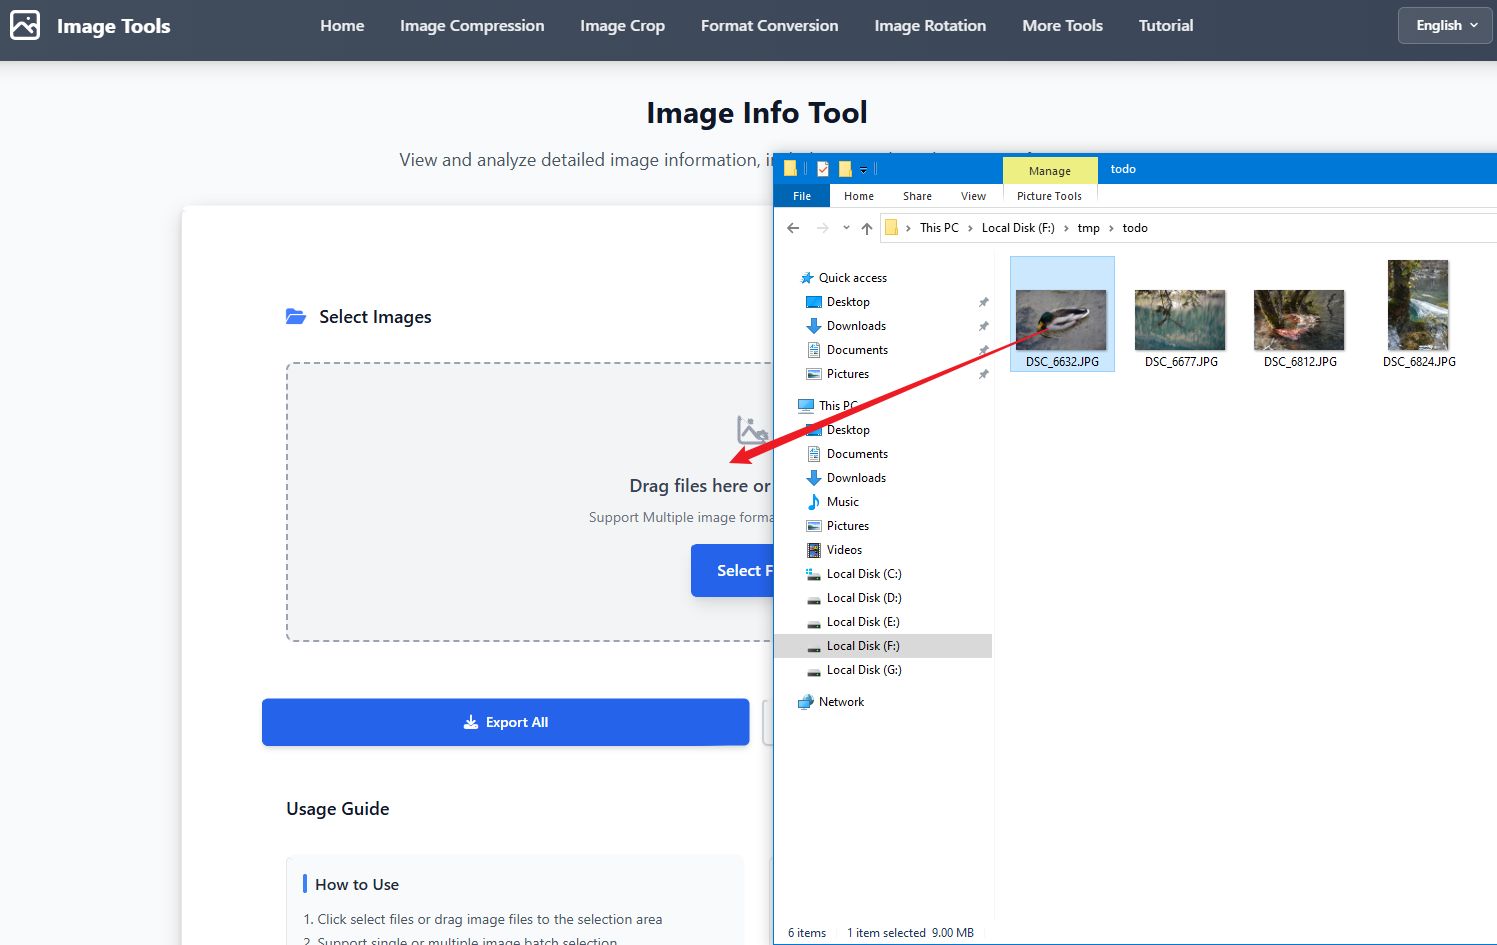
Step 1: Select Images
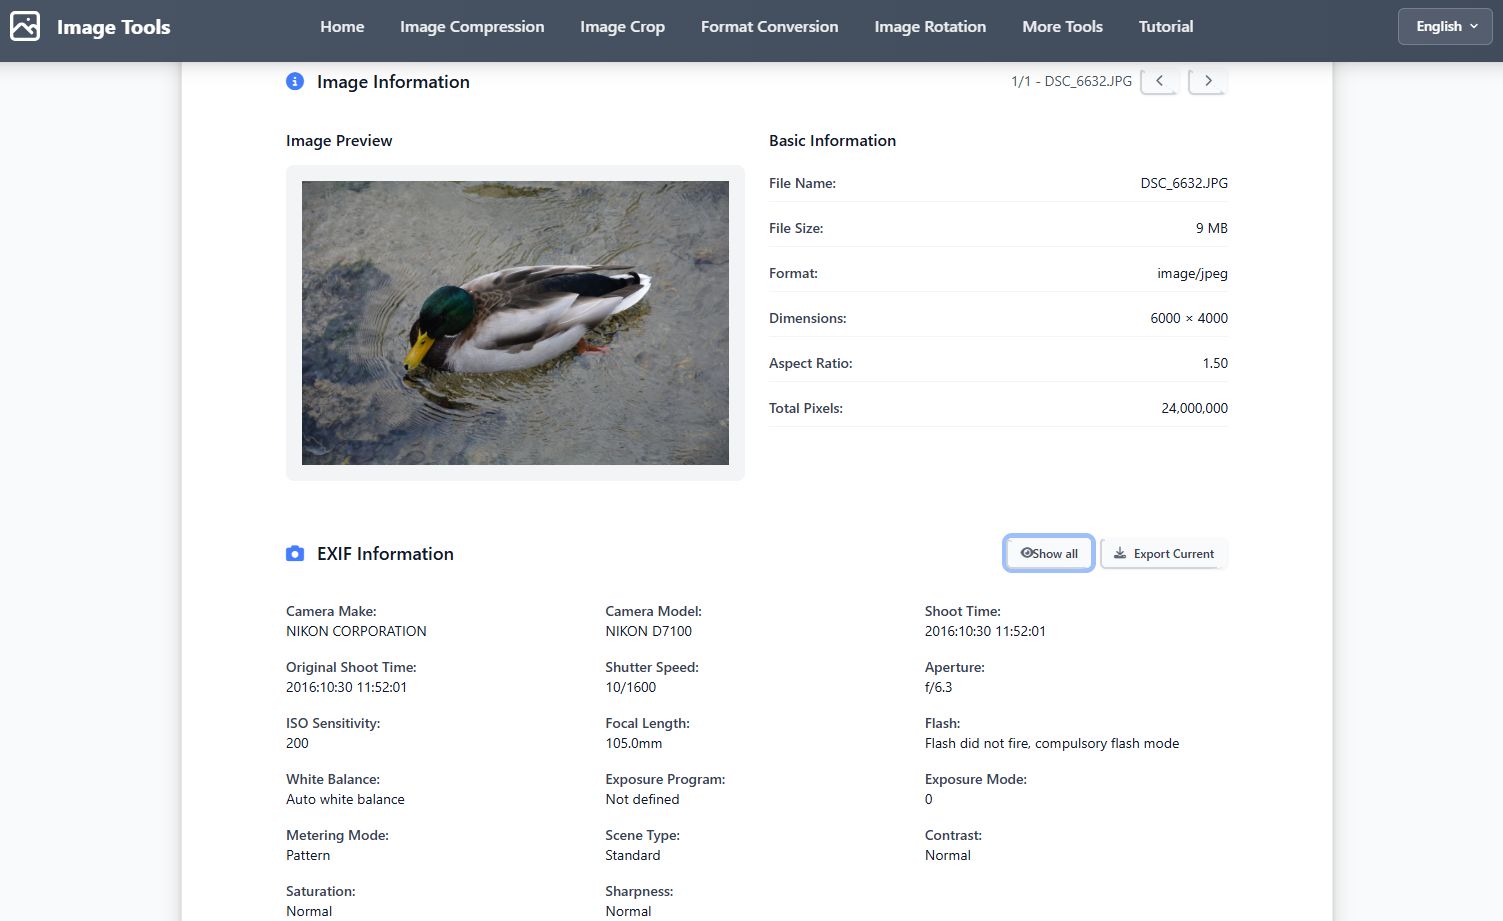
Step 2: View Information
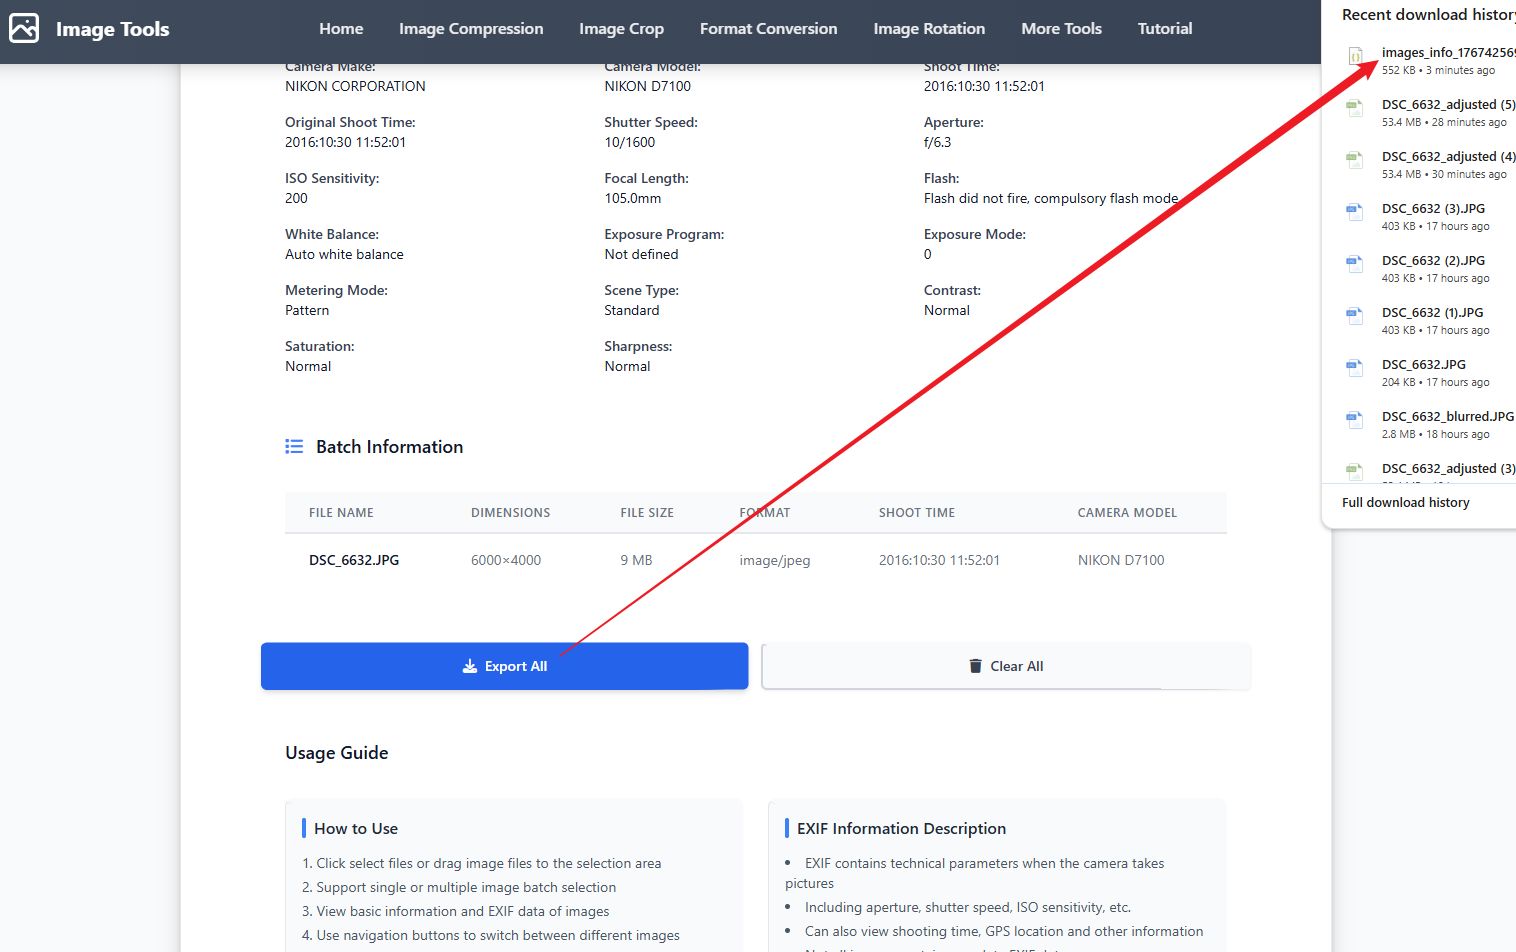
Step 3: Export Information
Video Tutorial
Step-by-Step Guide
- Click Select Images or drag and drop image files to the upload area
- Support single or multiple image batch selection
- View basic information: filename, dimensions, file size, format
- View EXIF information: shoot time, camera model, aperture, shutter speed, ISO, etc.
- View GPS information: latitude, longitude, altitude (if available)
- Use navigation buttons to switch between different images
- Can export information of a single or all images as a JSON file
Tips
- EXIF contains technical parameters when the camera took the photo
- Including aperture, shutter speed, ISO sensitivity, etc.
- You can also view shooting time, GPS location and other information
- Not all images contain complete EXIF data
- Some social media will delete the EXIF information of images
FAQ
Image Resize Tutorial
Overview
The image resize tool allows you to precisely adjust image dimensions, supporting pixels, percentages and preset sizes, maintaining aspect ratio or free adjustment.
Screenshots
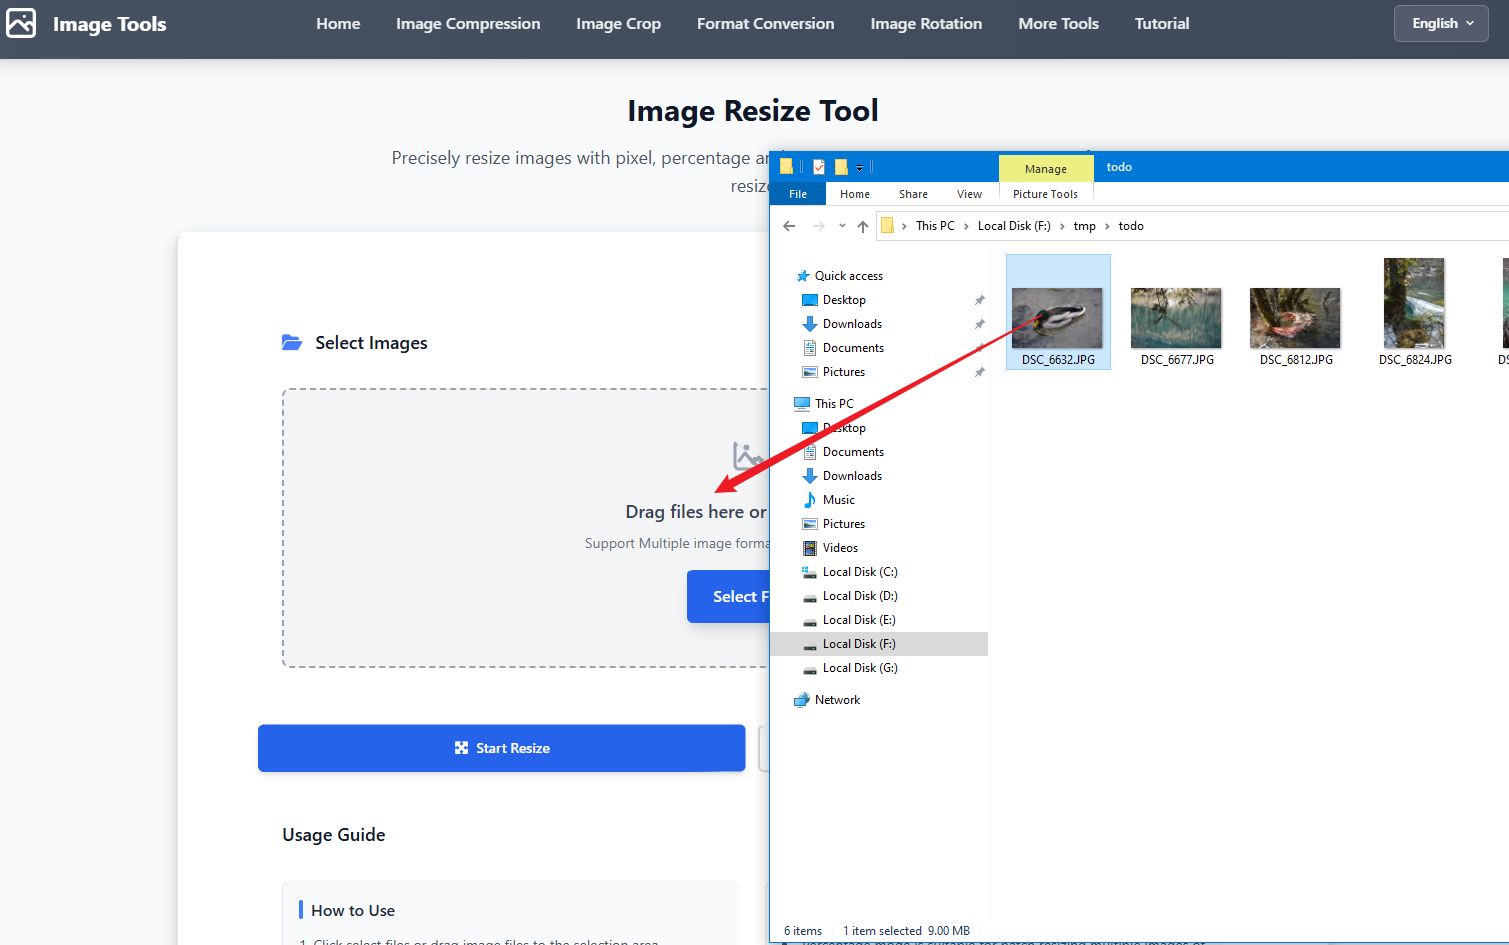
Step 1: Select Images
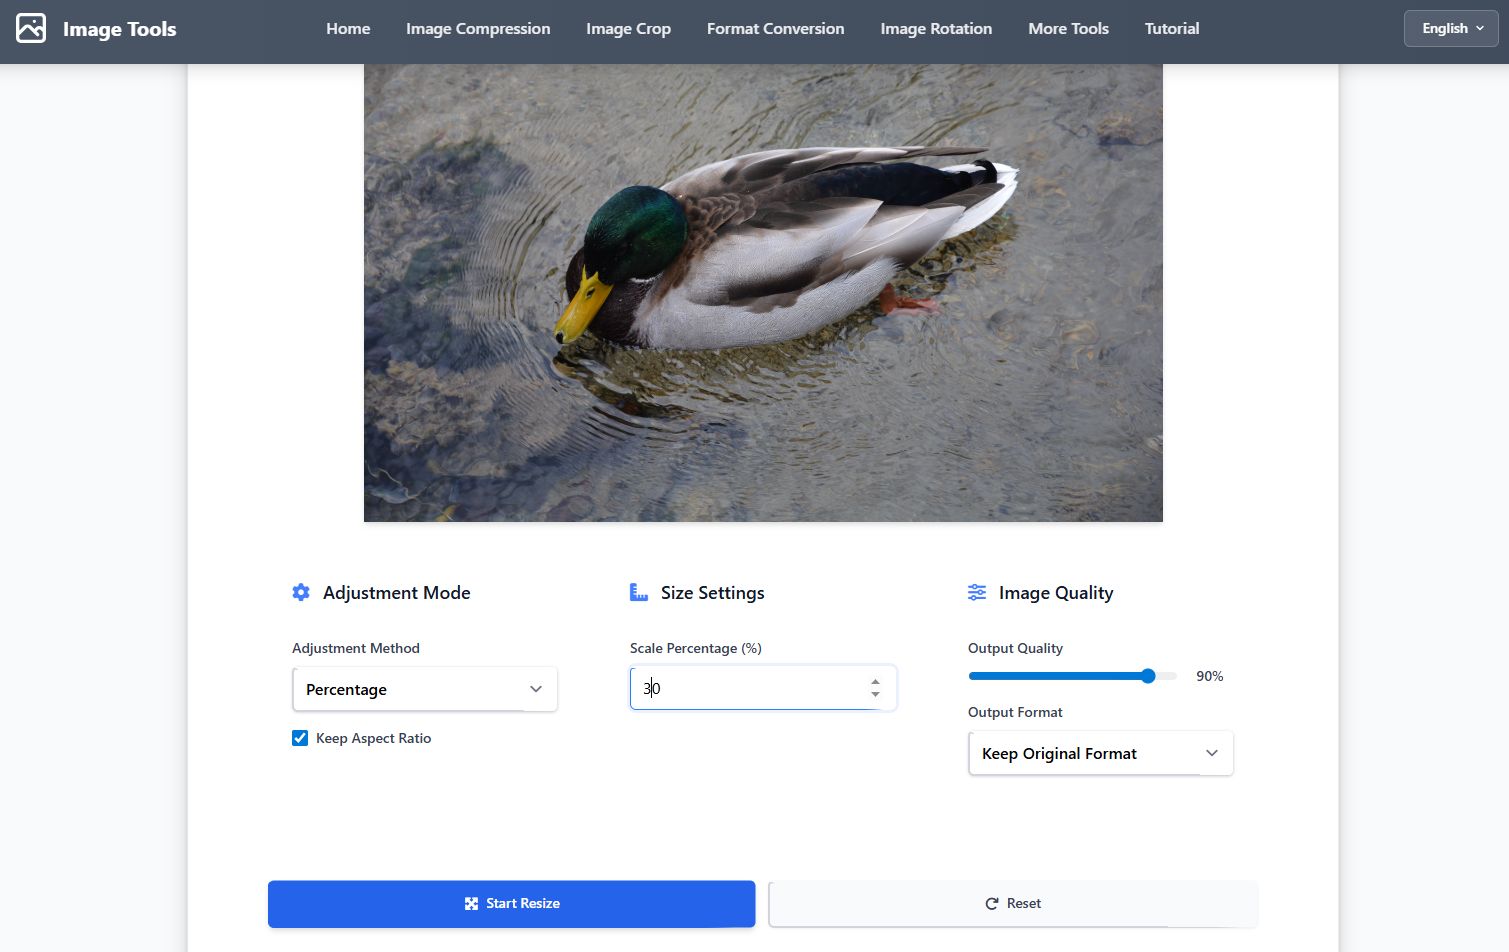
Step 2: Set Dimensions
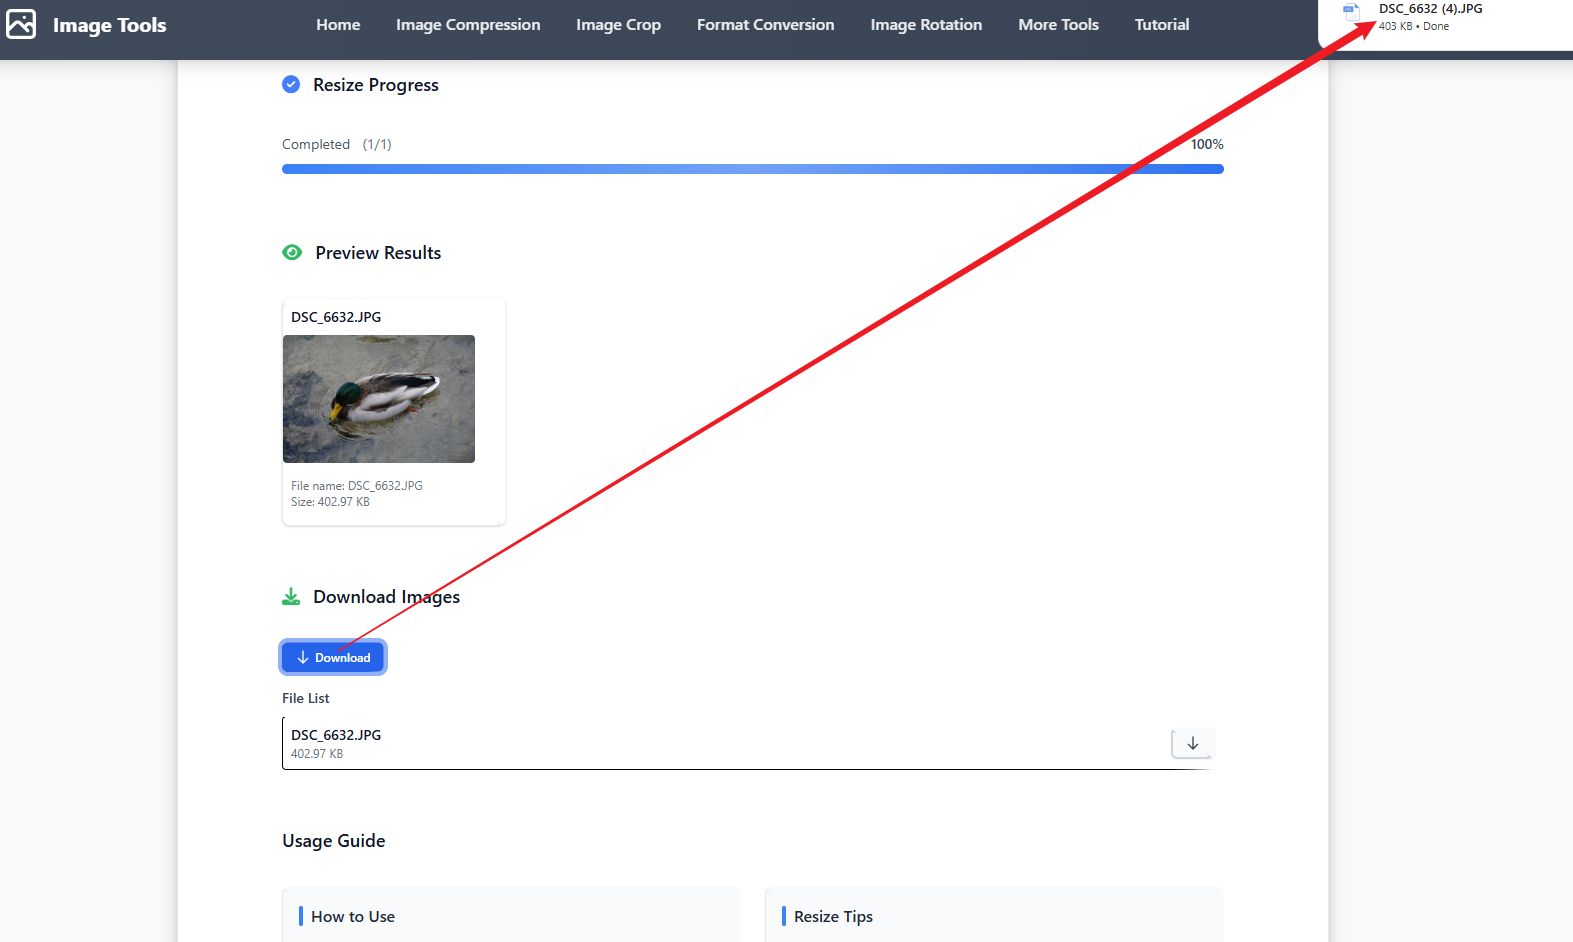
Step 3: Download Results
Video Tutorial
Step-by-Step Guide
- Click Select Images or drag and drop image files to the upload area
- Select adjustment mode: pixels, percentage, or preset size
- For pixel mode: enter the desired width and height
- For percentage mode: enter the scale percentage (e.g., 50% to reduce by half)
- For preset sizes: select from the list (Full HD, HD, SVGA, VGA, etc.)
- Enable keep aspect ratio to avoid image distortion
- Adjust quality and output format, then click Start Resize
- Download processed images, individually or as a ZIP file
Tips
- Percentage mode is suitable for batch scaling multiple images of different sizes
- Use pixel value mode to precisely control output dimensions
- Preset sizes include commonly used standard sizes
- Maintaining aspect ratio prevents image distortion
- Adjusting quality can balance file size and image quality
FAQ
Image Blur Tutorial
Overview
The image blur tool allows you to add mosaic effects to images, protecting privacy information, supporting batch processing of multiple images.
Screenshots
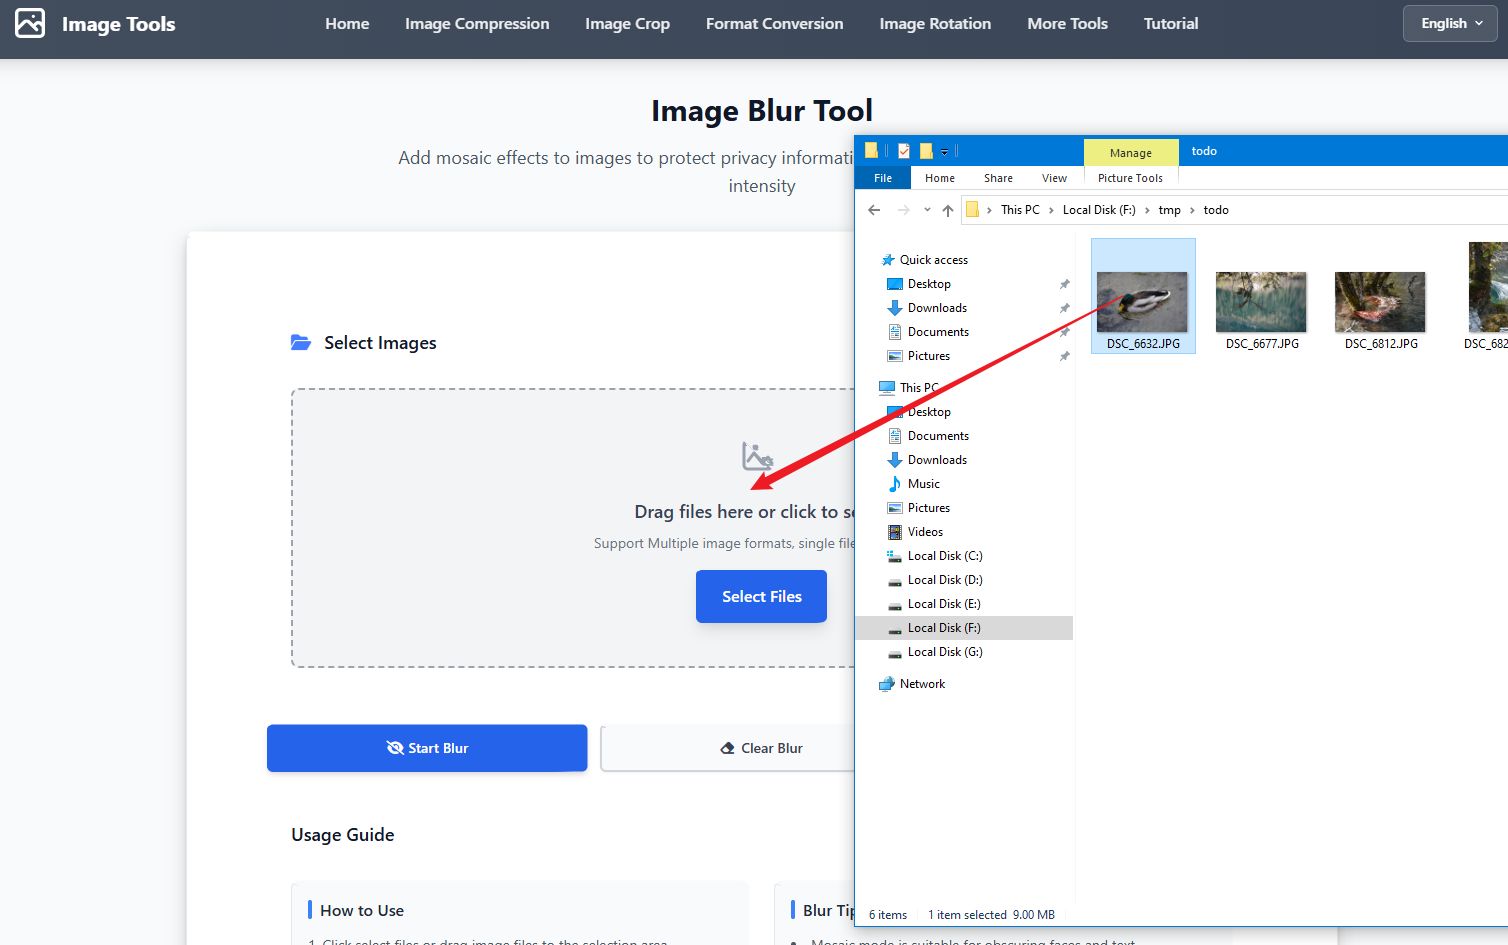
Step 1: Select Images
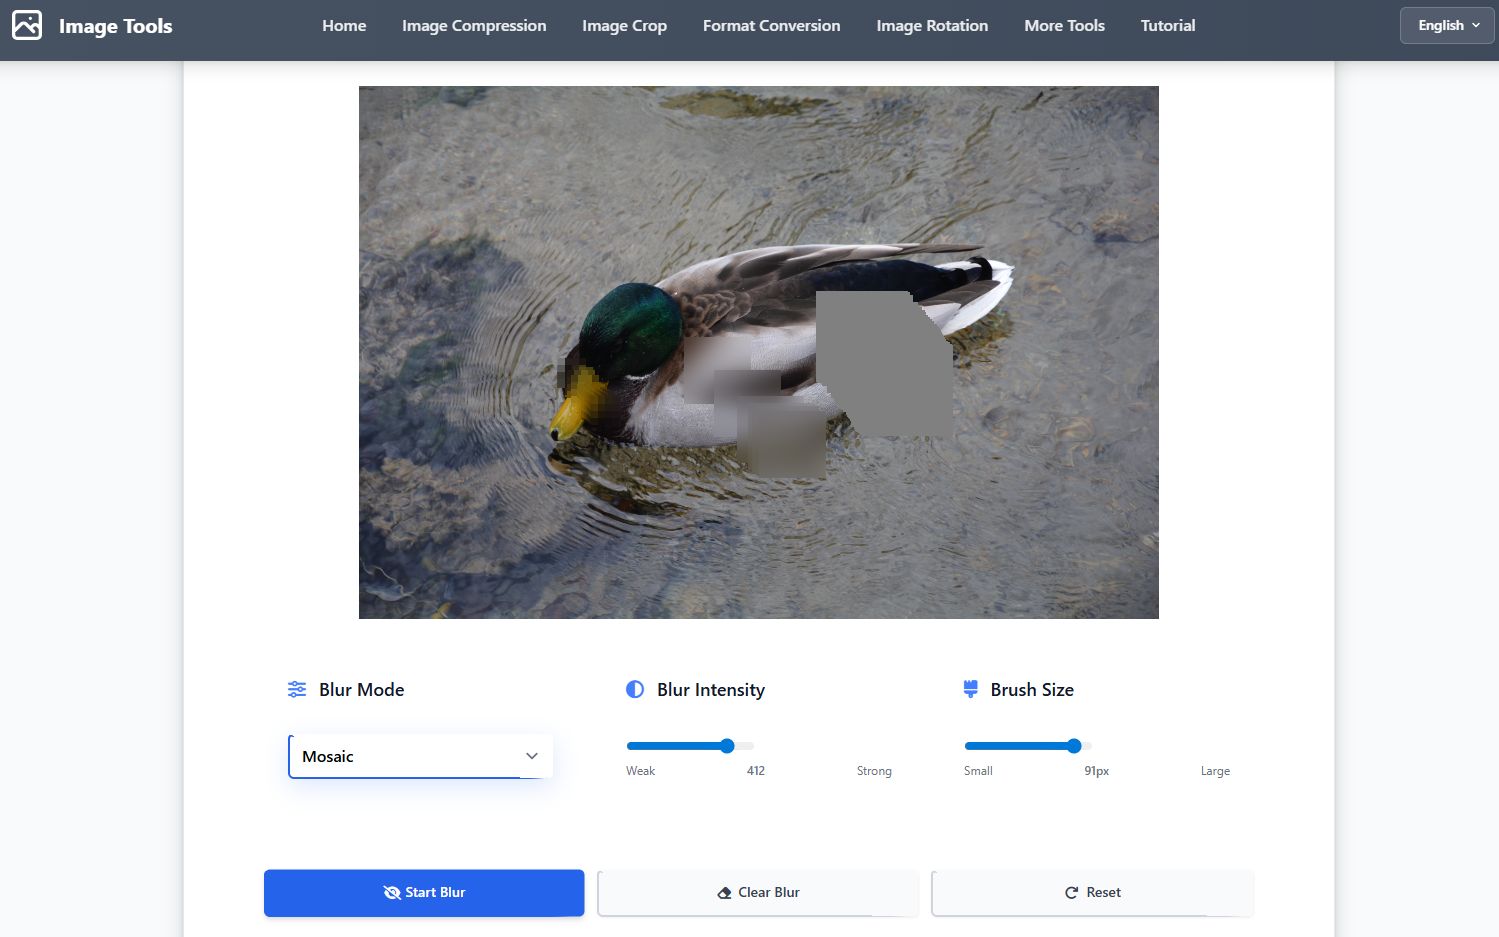
Step 2: Select Blur Area
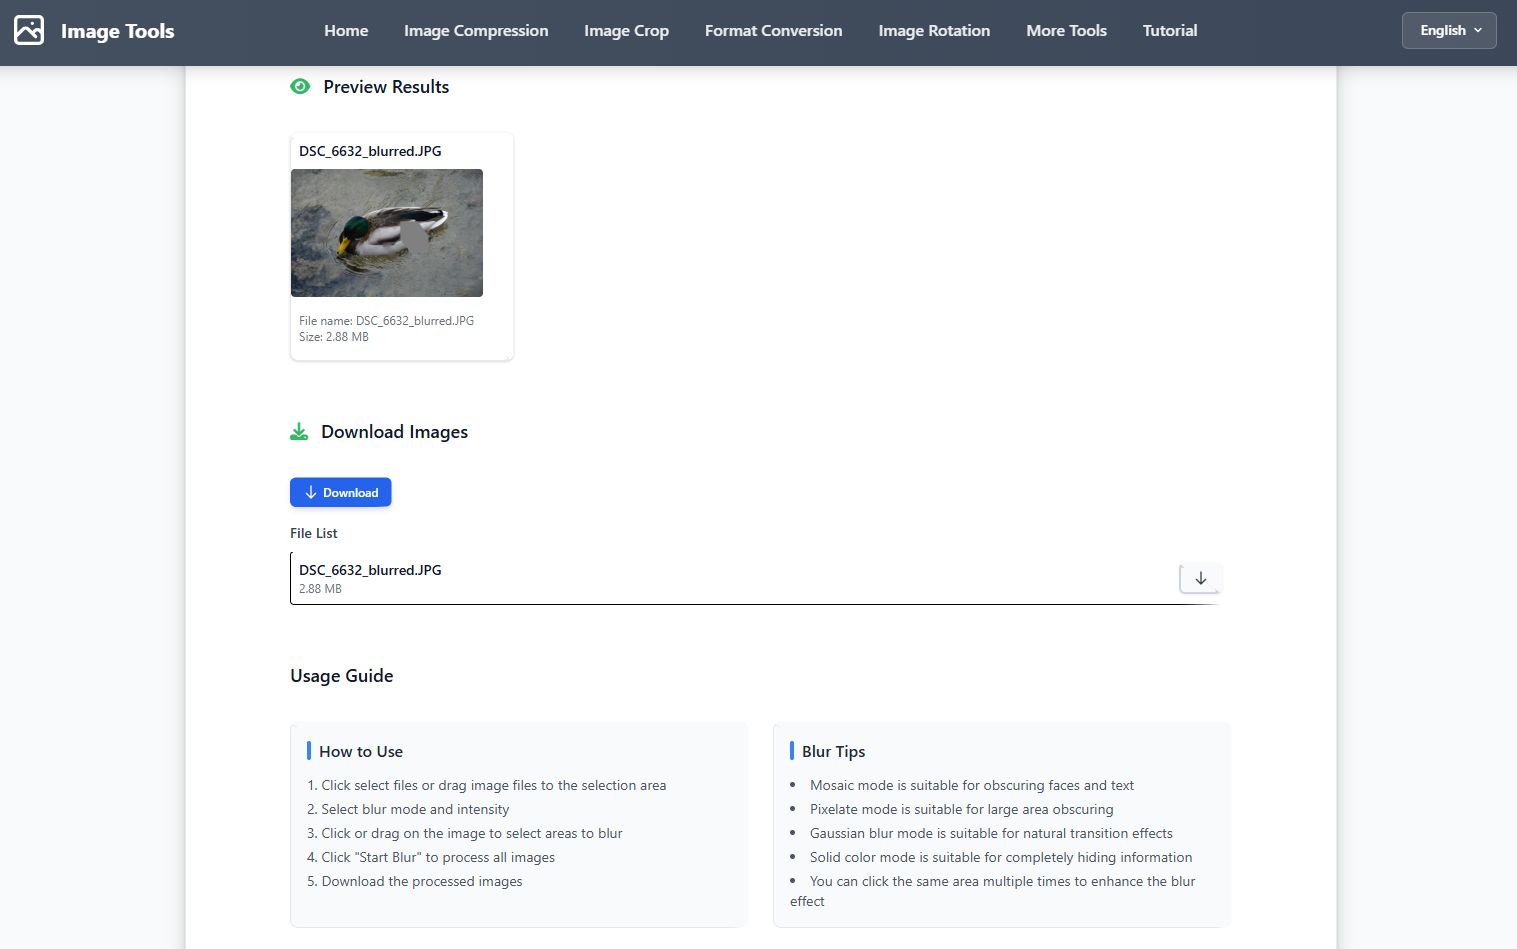
Step 3: Download Results
Video Tutorial
Step-by-Step Guide
- Click Select Images or drag and drop image files to the upload area
- Select blur mode: mosaic, pixelate, gaussian blur, or solid block
- Adjust blur intensity: weak or strong
- Adjust brush size: small or large
- Click or drag mouse on the image to select areas that need blurring
- You can click multiple times on the same area to reinforce the blur effect
- Click Start Blur to process all images
- Download processed images, individually or as a ZIP file
Tips
- Mosaic mode is suitable for obscuring faces and text
- Pixelate mode is suitable for large area obscuring
- Gaussian blur mode is suitable for natural transition effects
- Solid color mode is suitable for completely hiding information
- You can click the same area multiple times to enhance the blur effect
FAQ
Image Adjustment Tutorial
Overview
The image adjustment tool allows you to adjust brightness, contrast, saturation and other parameters, supporting preset effects, batch processing of multiple images.
Screenshots
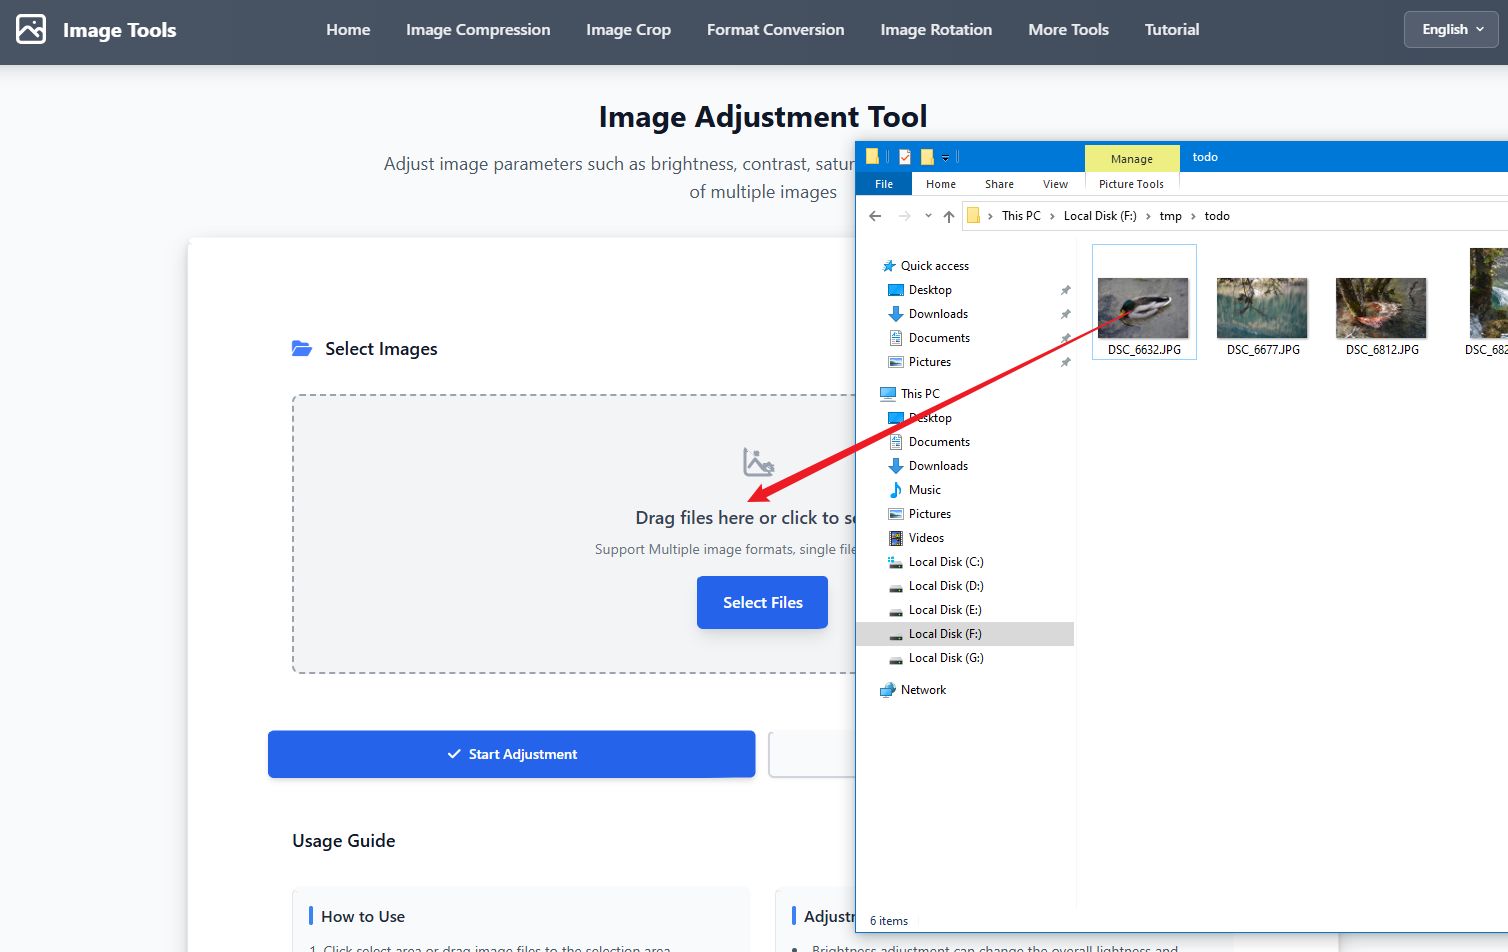
Step 1: Select Images
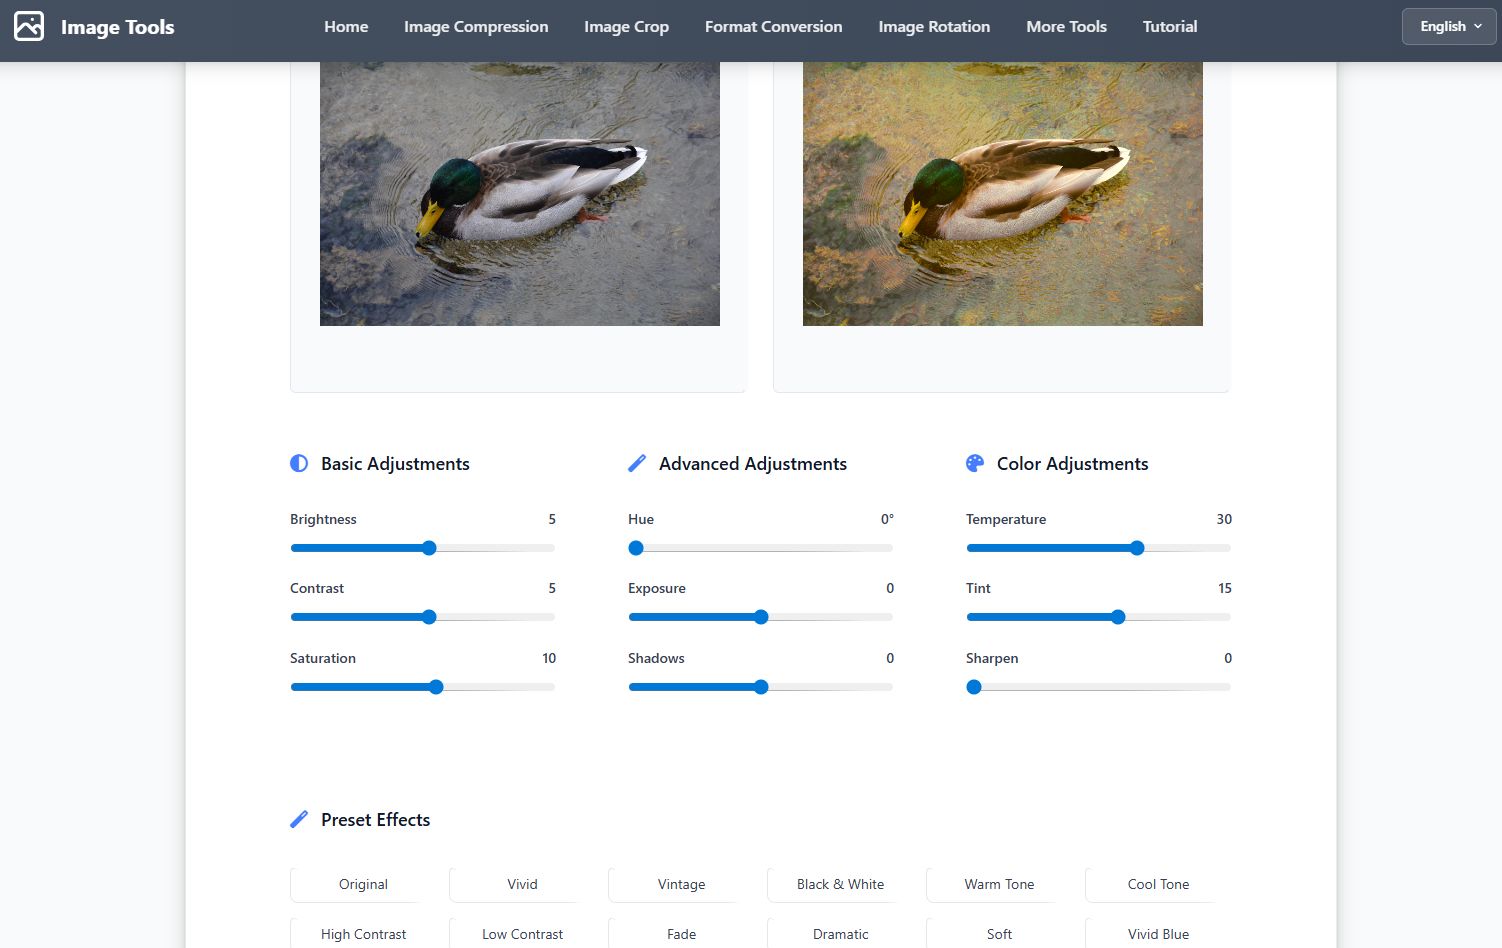
Step 2: Adjust Parameters
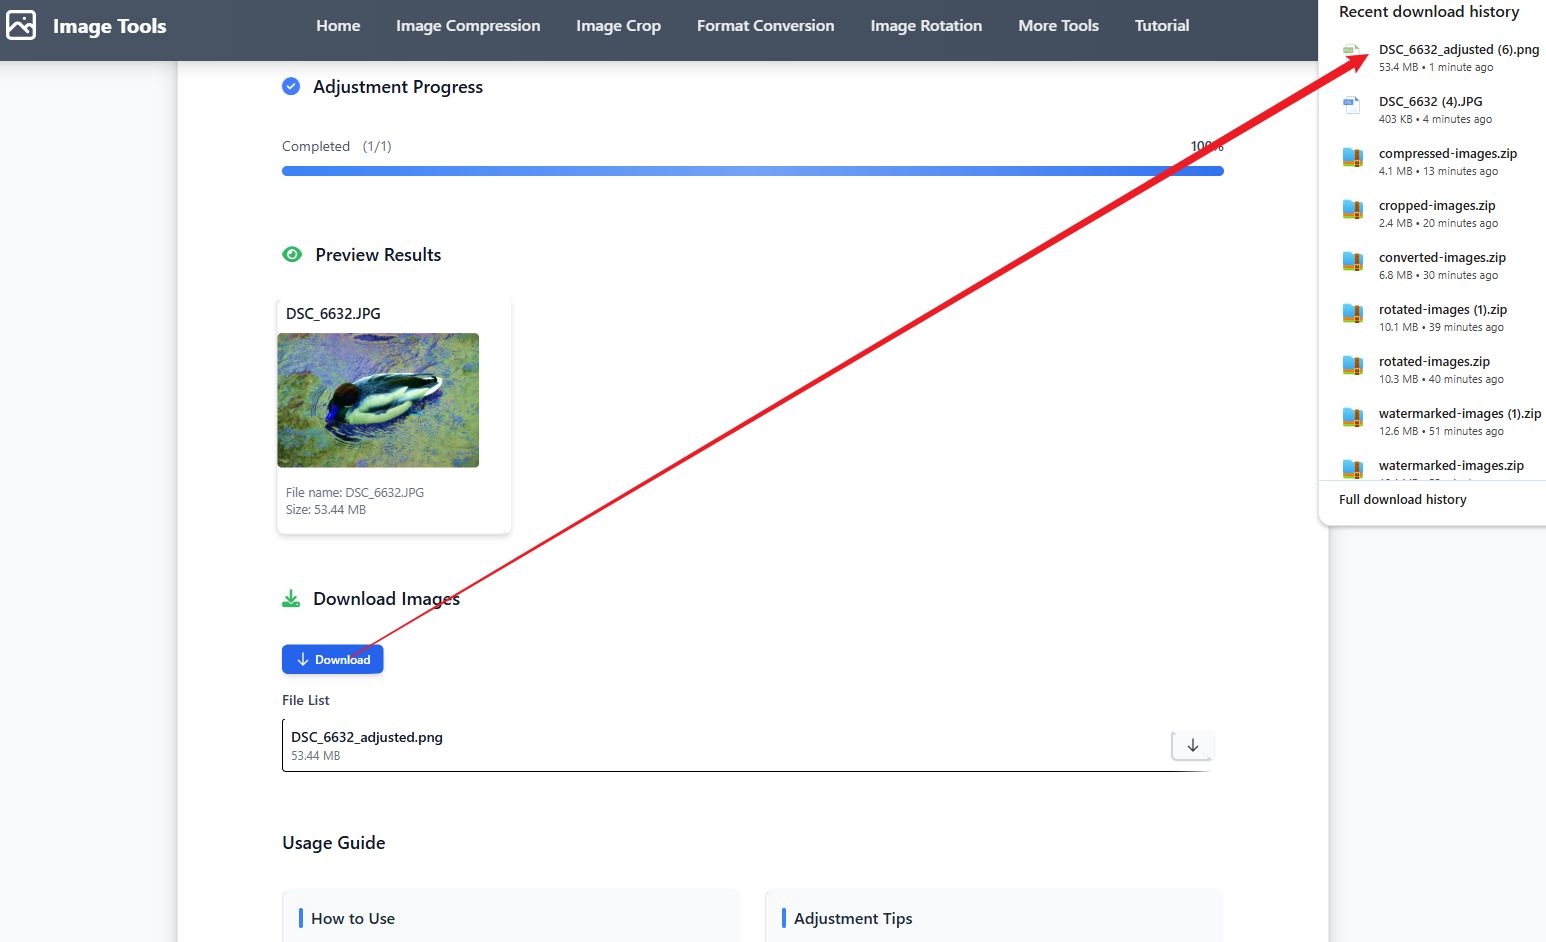
Step 3: Download Results
Video Tutorial
Step-by-Step Guide
- Click Select Images or drag and drop image files to the upload area
- Use sliders to adjust image brightness, contrast, saturation and other parameters
- You can try preset effects to quickly beautify images
- Click Start Adjustment to process all selected images
- Download adjusted images, individually or as a ZIP file
Tips
- Brightness adjustment can change the overall lightness or darkness of the image
- Contrast adjustment can enhance or reduce the difference between light and dark areas of the image
- Saturation adjustment can change the color vividness of the image
- Hue adjustment can change the overall color tone of the image
- Using preset effects can quickly apply professional adjustment combinations
FAQ
Camera Border Tutorial
Overview
The camera border tool adds a white border at the bottom of images with fake camera shooting information. It supports multiple camera brands (Leica, Hasselblad, Sony, Canon, Nikon, Fujifilm), random parameter generation, and batch processing.
Screenshots
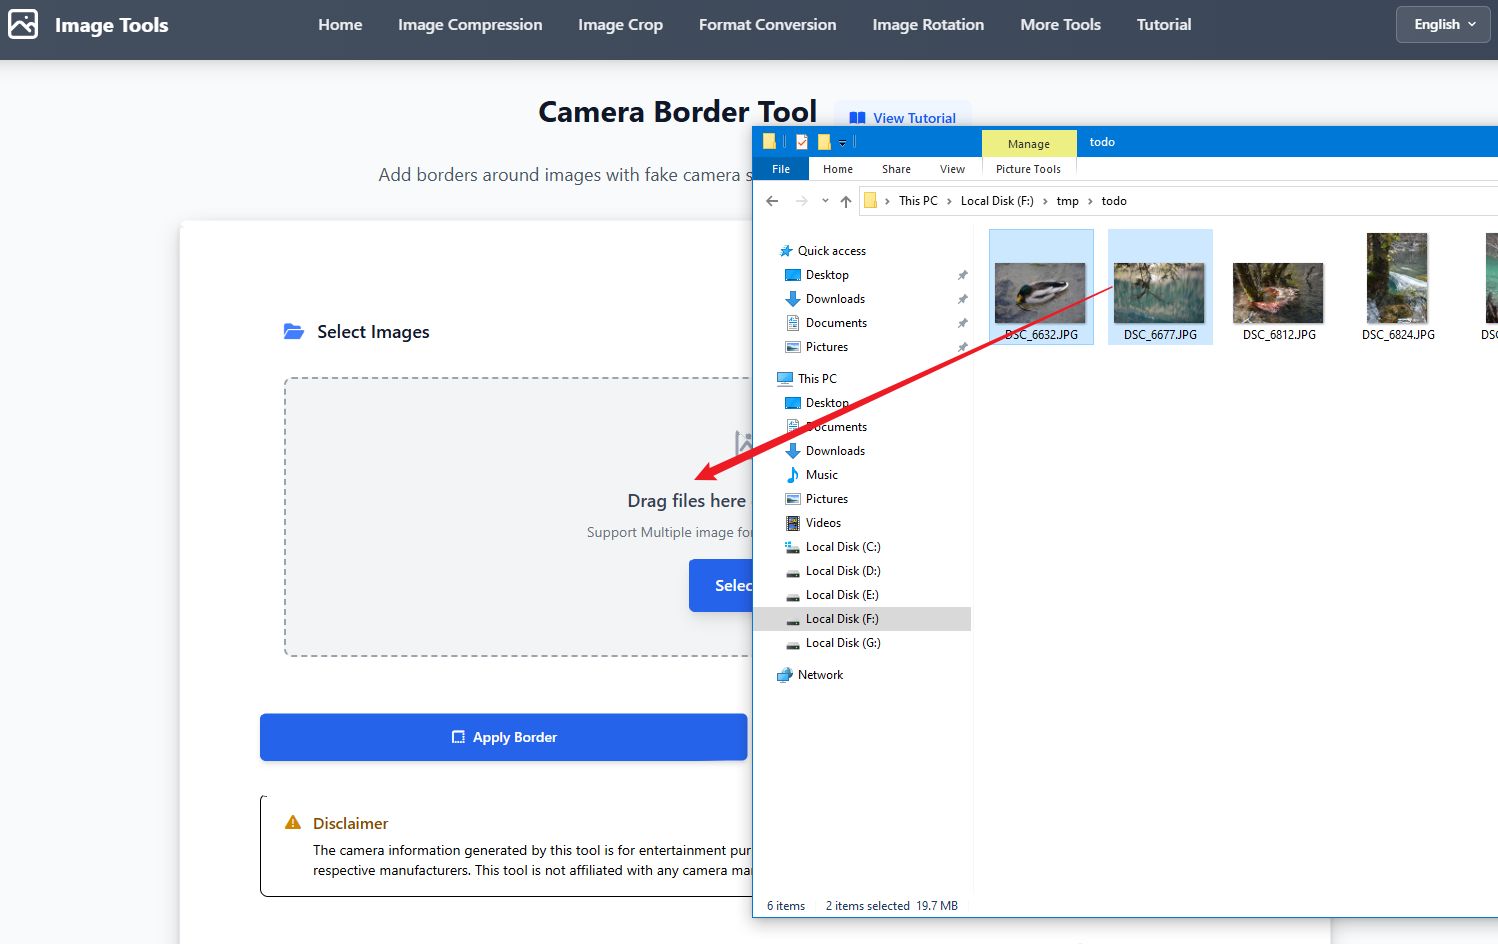
Step 1: Select Images
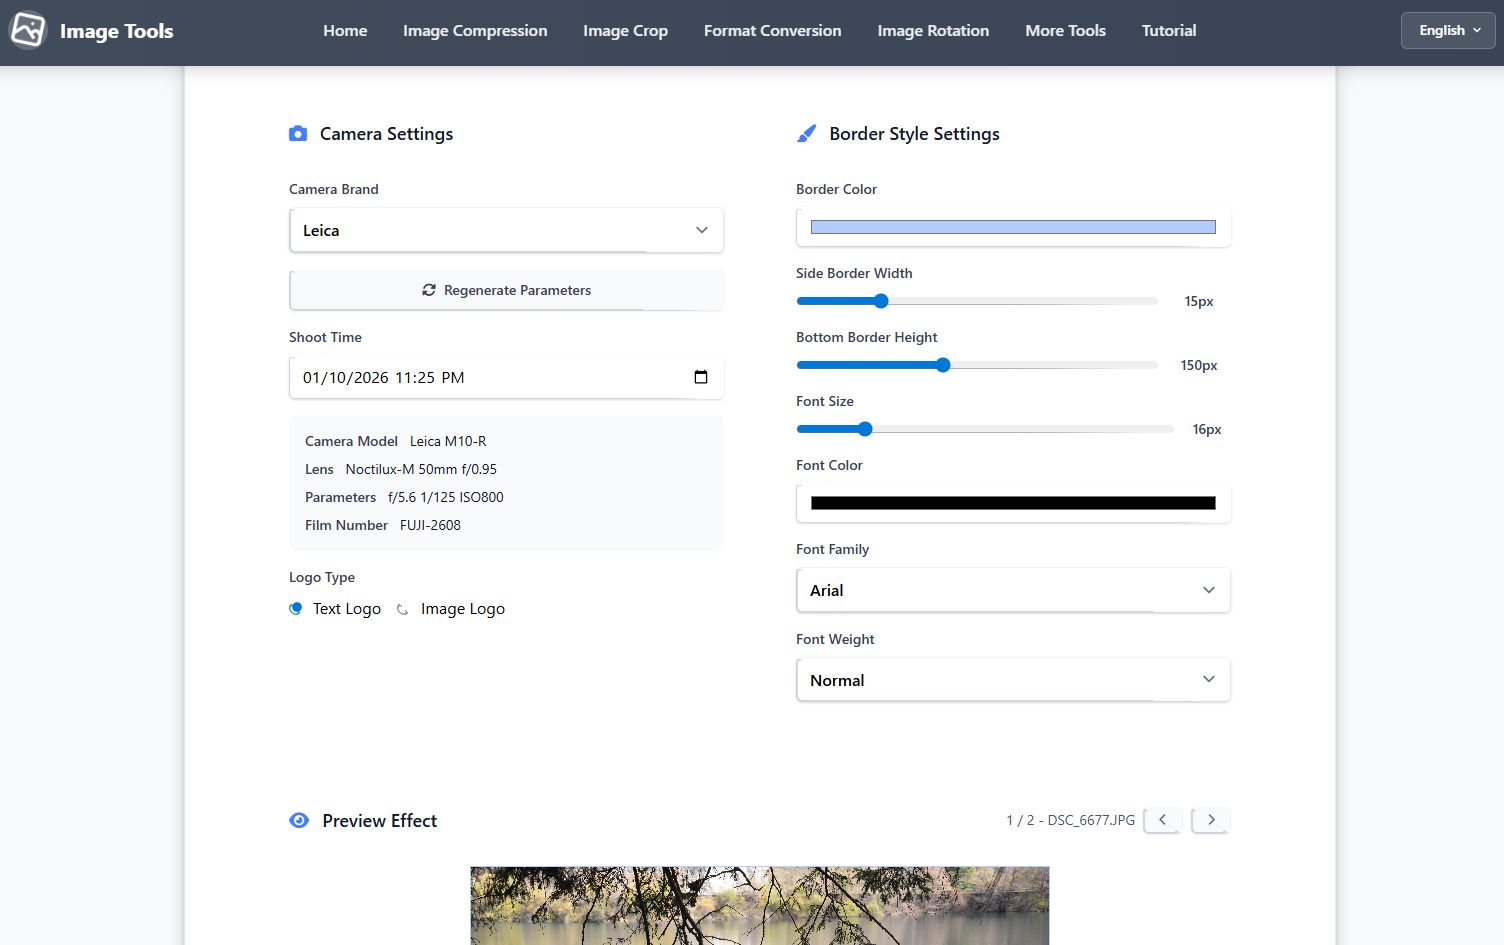
Step 2: Configure Camera Settings
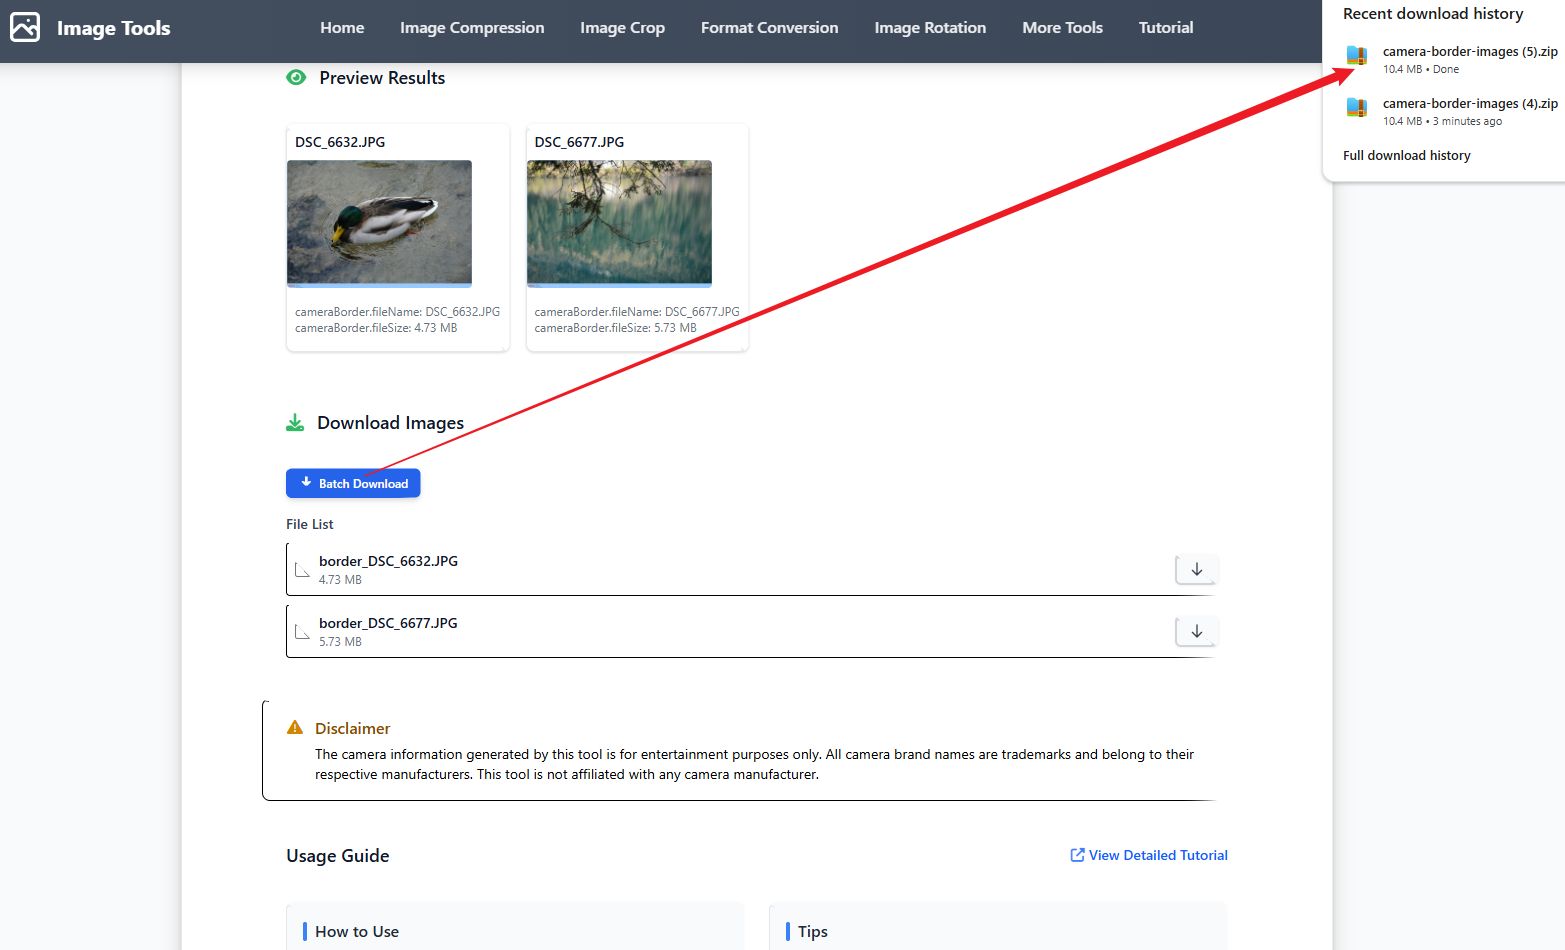
Step 3: Download Results
Video Tutorial
Step-by-Step Guide
- Click Select Images or drag and drop image files to the upload area
- Select a camera brand from the dropdown (Leica, Hasselblad, Sony, Canon, Nikon, Fujifilm)
- Click Regenerate Parameters to generate new random camera parameters (model, lens, aperture, shutter speed, ISO, film number)
- Choose logo type: text logo (camera brand name) or image logo (upload your own image)
- Adjust border style settings: border height, font size, font color, font family, and font weight
- Set shoot time (defaults to current time) or enter a custom date/time
- Preview the effect and adjust parameters until satisfied
- Click Apply Border to process all selected images
- Download processed images, individually or as a ZIP file
Tips
- Different camera brands generate corresponding models and lenses for more realistic effects
- Border height automatically adjusts based on image size for optimal display
- You can choose between text logo and image logo; uploaded image logos will be automatically resized to fit
- Batch processing applies the same settings to all selected images
- All camera parameters are fictional and for entertainment purposes only
- Click regenerate multiple times to find the perfect combination of parameters